Quickstart: Set Up Your Portal in 5 Steps
We know that many knowledge management solutions require a significant time investment just for setup. We wanted Perdix to be different. That's why we’ve boiled down the process into 5 straightforward steps to accelerate your "time to value." Here they are:
- Configuring Roles and Permissions
- Create Your Initial Teams
- Set Up Your First Tags
- Add Content (Optional but Encouraged)
- Invite Your Users
Explore these steps through the linked articles above, and don't hesitate to reach out if you hit any roadblocks.
📘 Related Reads:
- Mastering Branches, Teams, and Tags
- The Perdix Dashboard: A Closer Look
- Discovering Perdix Facets
Note: If you're the one setting up your company’s portal, you'll be recognized as the inaugural Super Admin. Want to know more? Read about the Super Admin role and its privileges here.
Hello, and welcome to Perdix! We're thrilled you're here. At Perdix, we're motivated by a simple conviction: the reflex to "just Google it" can and should be brought to your workplace. By centralizing documents, queries, and creative sparks, we aim to transform your collective knowledge into a powerhouse searchable by anyone on your team—quickly and efficiently.
📖 In this guide:
- Quickstart: Set Up Your Portal in 5 Steps
- First-time Login: Meet the System-Generated User
- Need Help? We’ve Got You Covered
Our commitment to your success doesn't end here. If you're seeking advice on setup, content upload, user addition, or training, feel free to connect directly with your dedicated Perdix team contact. We're here to facilitate your journey.
Ready to leverage your workplace knowledge like never before? Let's get started with Perdix! 🌟
Logging In for the First Time
When you're added as a user to the Perdix Portal, you'll receive an email from The Perdix Team to activate your account. Simply click on the link provided in the email to set up your password.

You'll be taken to the password recovery page where you can enter your new password and confirm it. Once done, click on the "Reset Password" button, and you'll be directed to the login page.

On the login page, enter your username, password, and click "Login" to access your Perdix portal.

When you log in to Perdix, you'll land on the Dashboard of the portal. From here, you can easily jump to different sections of the portal using the available navigation options or by utilizing the search feature.

Let's take a closer look at the features of the portal Dashboard.
Left-Side Navigation

- Logo: The portal logo allows you to return to the dashboard from any page within the portal.
- Branch Navigation: If you have access to multiple branches, you can switch between them using this navigation option.
- Facet Navigation: Each facet of the portal is listed here, and you can navigate to specific facets by clicking on them.
- Support Information: This section provides details on how to get additional support for Perdix, including contact information.
- User Profile: Your user profile is displayed at the bottom of the left-side navigation, showing your username and profile picture.
Main Dashboard

- Portal Search: Located in the center of the dashboard, the search bar allows you to search for specific content within the portal. You can filter search results using the options in the upper right-hand corner.
- Announcements: Active and archived announcements are displayed below the search bar.
- My Activity: This section shows your recently visited content and most visited content, making it convenient to access items you've recently viewed or items you visit often.
Top Navigation

- Search: Clicking on the magnifying glass icon opens the portal's search modal, allowing you to search for content anywhere within the portal.
- Favorites: The star icon displays your favorite documents in chronological order, enabling quick access to them.
- Quick Links: The lightning icon provides links to external sources that are relevant to your organization and can be accessed within the portal.
- Visited: Clicking on the list icon shows your visited items in timeline order, offering easy access to recently accessed content.
That covers the key features of the Perdix Dashboard. Whether it's navigating through facets, utilizing search, or accessing your favorites and visited items, the Dashboard provides a central hub for efficient portal exploration.
At Perdix, we've structured our platform around five key components, which we fondly refer to as "facets." Each facet offers distinct features and a range of tools to effectively manage your company's knowledge. Let's dive into each of these facets:
Announcements📣
The Announcements facet resides prominently on the Dashboard, ensuring that users encounter it as soon as they log into the portal. This space is designed for broadcasting updates, events, meetings, news, and more to your teams within the portal.
Announcements come with assigned Teams and Tags upon creation, allowing you to target specific groups. Only users with appropriate permissions can create, update, or delete announcements.
Common use cases for Announcements include:
- Informing teams about updates to resources or other portal content
- Announcing new policies and procedures
- Acknowledging exceptional work
- Sharing daily goals, targets, or outcomes
- Notifying teams about upcoming meetings or office events (like pizza parties!)
Resources 📝
The Resources facet, accessible through the left-side navigation pane, serves as a repository for company-curated documents. This includes checklists, processes and procedures, scripts, and more.
Resources can be uploaded in various file formats, including .pdf, .docx, .xlsx, .jpg, .png, and .tiff. They can be categorized into Teams and Tags, ensuring that only relevant users have access. As with Announcements, only users with the proper permissions can create, update, or delete resources.
Common types of Resources include:
- Checklists
- Internal processes or procedures
- Workflows, charts, or visual aids
- Email or phone scripts
- Marketing and promotional materials
Manuals 📘
The Manuals facet, found on the left-side navigation pane, serves as a repository for formal policy documents and reference materials that may require special handling, such as legal documents or materials subject to approvals.
Manuals must be uploaded in PDF format. Unlike some other facets, manuals are not assigned to Teams or Tags, making them viewable by everyone in the organization with the appropriate permissions. Only users with the necessary permissions can create, update, or delete manuals.
Common uses for Manuals include:
- Government or industry documents
- Human resource materials
- Textbooks or ePublications
- Handbooks
- Instruction or user manuals
Additionally, the Manuals facet hosts our innovative Annotations feature, allowing users to create, share, and transition notes to newer versions of the document, ensuring knowledge preservation and sharing.
Questions & Answers 💬
The Questions & Answers (Q&A) facet, located in the left-side navigation pane, is where you can pose questions, provide answers, and organize queries from your team.
Both Questions and Answers can feature formatted text, images, attachments, and links. Questions are assigned to Teams and Tags upon creation, ensuring that only relevant teams have access. Just like Announcements and Resources, only users with the appropriate permissions can create, update, or delete questions, answers, and comments.
The Question & Answer facet can be tailored to your organization's needs:
- It can serve as a free-for-all Q&A platform where anyone can ask or answer questions.
- It can act as an FAQ section, curating only the most common questions and answers.
- It can be a curated Q&A section where specific curators create questions and answers to ensure accuracy.
Knowledge Base 🎓
Accessed from the left-side navigation pane, the Knowledge Base facet serves as a hub for articles, tutorials, and additional reading content.
Knowledge Base articles support formatted text, images, embedded videos, attachments, and links. Unlike some other facets, Knowledge Base articles are not assigned to Teams or Tags upon creation, making them viewable by everyone in the organization with the appropriate permissions. Only users with the necessary permissions can create, update, or delete Knowledge Base categories or articles.
Common uses for Knowledge Base articles include:
- Additional training in the form of videos and written content
- Industry updates, synopses, or thought pieces
- Case studies or example use cases
You have the ability to update your personal information within the Profile section of the portal. In your profile, you can view and modify your First Name, Last Name, Profile Picture, and Password. Your profile also displays your Email address, Role, Teams, and Branches.
In this section, we'll cover:
- Updating Your Profile Details
- Updating Your Profile Picture
- Updating Your Password
Updating Your Profile Details
To update your profile information:
1. Navigate to the lower left-hand corner of your portal and click on your name/profile picture to access the profile menu.

- Select EDIT PROFILE to open your profile details page.

2. Make the desired edits to your profile fields, then click Save to apply your changes.

Note: Editing roles, teams, and branches requires specific permissions. For such updates, kindly contact your Account Administrator. Keep in mind that your email address cannot be edited.
Updating Your Profile Picture
To update your profile picture:
1. Use the steps above to navigate to your profile details page.
2. At the top of your profile, click the Upload Image button.

3. Drag and drop your profile image into the pop-up window, or click Select Files to Upload and choose the image file you want as your avatar. (Supported formats: JPG, GIF, or PNG; maximum file size: 800kb)

4. Optionally, use the Crop, Circle, or Rotate tools to refine your image, then click Save within the pop-up. Additionally, remember to click "Save" in the lower right-hand corner of your profile after making all desired edits to ensure your profile picture updates.

5. Click Upload to add the new image to your profile.

6. Click Save to apply the change to your profile.

⚠️ Note: Failure to click "Save" in the lower right-hand corner of your profile will result in your profile picture not being updated.
Updating Your Password
You can also update your password through the Change Password tab in your Profile. For more information on resetting your password, please refer to the Resetting Your Password section.
Seeking Assistance with Live Support 🆘
If you encounter any issues with portal features or have general inquiries about how the portal operates, our team is here to assist you. Reach out to us for help through the following channels:
- Live Support Hours
- Contacting Live Support
- Getting Help Outside of Live Support Hours
Note: Our Live Technical Support team specializes in technical questions related to the functions and features of the Perdix portal. They cannot address inquiries related to your company, company or industry materials, or job workflows.
Live Support Hours
Our Live Technical Support team is available from Monday through Friday, 8 a.m. to 5 p.m. CST. Even outside of these hours, feel free to contact us, and we'll aim to respond within one business day for off-hours requests.
Contacting Live Support
Access Live Support from any page of your portal by clicking the purple chat bubble in the lower right-hand corner. This will open a chat window where you can:
- Enter your email and name (optional) and click "Start."
- Add your question in the chat window
Our key units of organization, Branches, Teams, and Tags are designed to streamline your work and maximize efficiency. Let's explore them one by one.
Branching Out to Branches
Think of branches as independent, mini portals functioning within your Perdix portal. Every portal needs to have at least one branch, and these act as the primary building blocks of your portal. Each branch is a self-contained unit with its own dashboard, content, teams, and tags. You only interact with the branches you have access to.
Creating branches allows your organization to compartmentalize information without any risk of confusion or information overlap. Your branches can reflect your working groups, clients, or even geographical locations - like the northeast.region, southeast.region, or midwest.region.
Note: Creating or deleting a branch requires a Perdix Team Member's intervention because we don't want any unintentional data loss. Please reach out to your Account Manager to request a branch creation or deletion.
Teaming Up
Every branch houses several teams, and every user is part of at least one such team in a portal branch. Now, why is this important? The team you are part of determines the content you can see.
Being part of a team means you'll have specified access to resources, public annotations, announcements, and questions. Your team doesn't prevent you from perusing manuals or knowledge base articles if your role's "Read" permissions are turned on.
Tag, You're It!

In every branch, you'll also find tags. Tags are neat little identifiers that help users quickly understand the topic of a piece of content. You can use tags to locate resources, refine your search results, and filter through questions. In most portals, all users can access any tag inside their branch. However, some portals have exclusive tags that are only available to certain teams.
Creating a new tag requires permissions, but they make uploading a resource, creating an announcement, adding an annotation, and devising your Questions & Answers a whole lot easier.
Remember, your teams and tags will differ as you navigate between branches.
Welcome to Perdix! This guide will walk you through the process of activating your new Perdix account, setting your password, and logging in to the portal for the first time.
📖 In this guide:
- Logging In for the First Time
- Getting to Know the Perdix Dashboard
- Exploring Perdix Facets: Your Comprehensive Guide
- Updating Your Personal Information
- Seeking Assistance with Live Support
- Branches, Teams, and Tags
The Manuals section in Perdix provides a comprehensive toolkit for creating, managing, and annotating manuals within the system.
📖 In this guide:
- Understanding manual types
- Creating a manual (sections)
- Creating a manual (no sections)
- Uploading a new manual version
- Renconciling annotations between versions
Perdix offers two approaches to manual creation and management: Manual with Sections and Manual (No Sections). Both features are designed to help you efficiently manage your documentation, but they cater to different organizational needs.
Comparison of Manual Creation Methods
| Feature | With Sections | No Sections |
|---|---|---|
| Organization | Divides content into distinct sections | Treats the manual as a single unit |
| Best for | Large, complex documents | Shorter, simpler documents |
| Version control | Applied at both section and manual level | Applied to the entire manual |
| Navigation | Enhanced with section-based structure | Simple, whole-document navigation |
| Flexibility | Allows for targeted updates to specific sections | Requires updates to the entire document |
When to use Manual with Sections:
Choose this option when you need to:
- Organize complex, multi-topic documents
- Update specific parts of a manual frequently
- Provide easy navigation for large documents
When to use Manual without Sections:
Opt for this method when you:
- Have shorter, more focused documents
- Prefer simpler version management
- Typically update the entire document at once
Both approaches offer robust version control, allowing you to track changes, access previous versions, and ensure your team always has the most up-to-date information.
The ability to create a manual with sections allows you to upload and organize manuals into distinct sections, improving navigation and management of large documents.
How it works
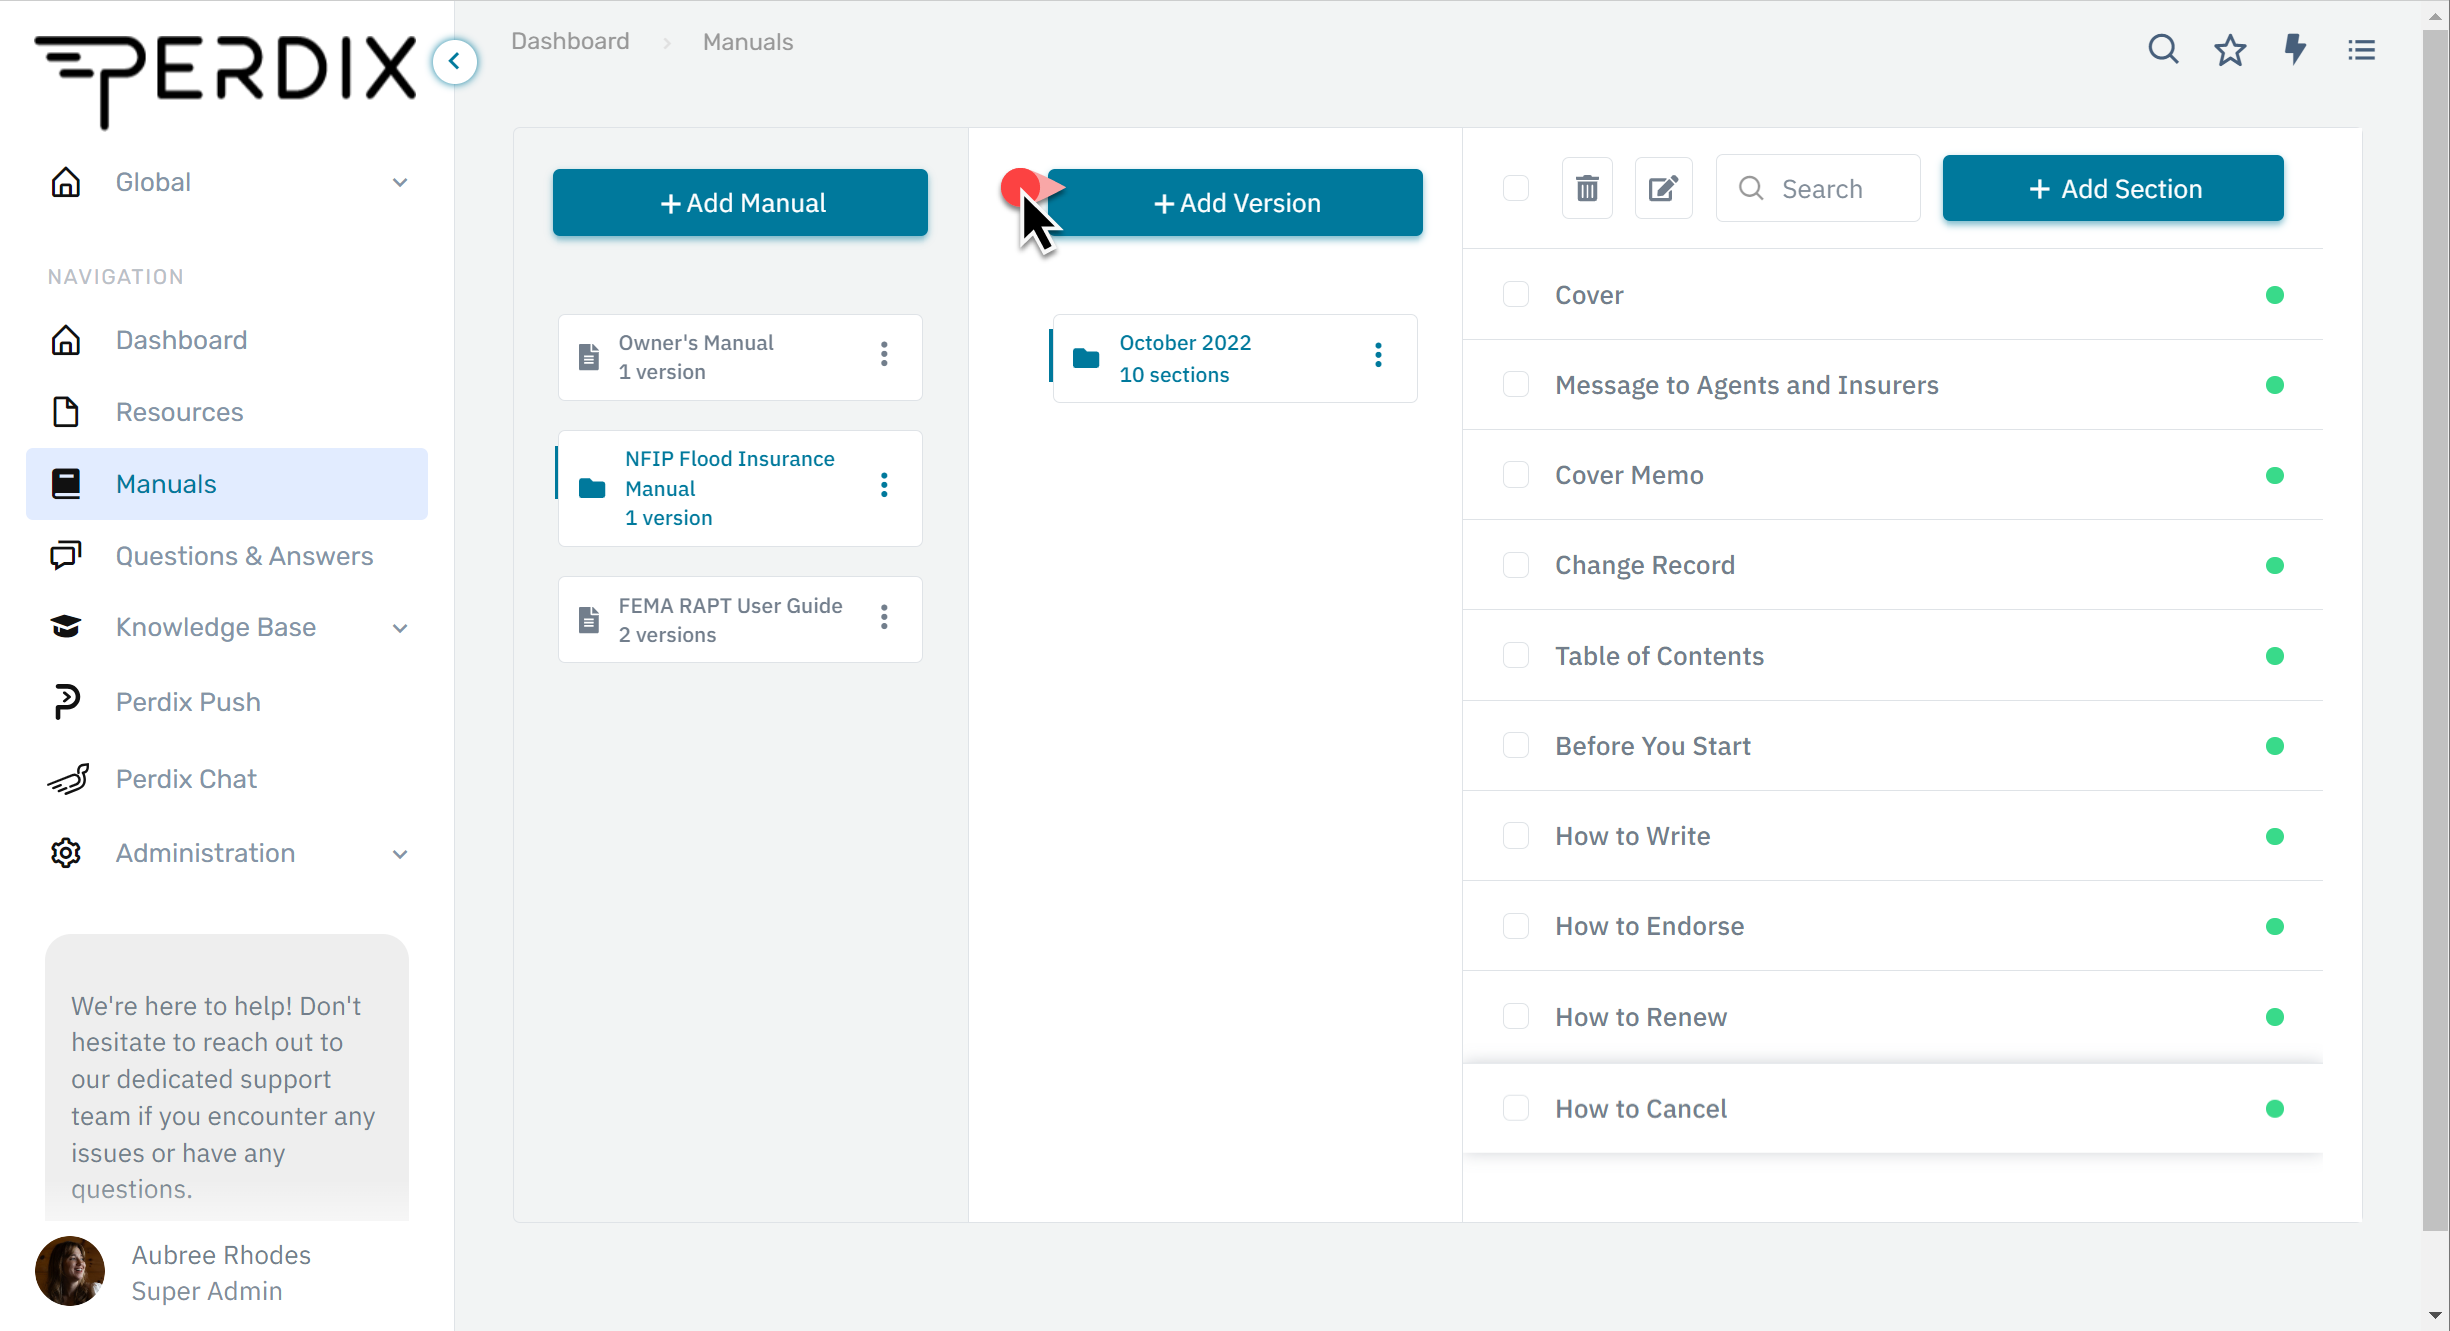
1. Navigate to the Manuals facet in your portal.

2. Click the + Add Manual button.
3. Enter the manual name. This name should apply to the entire document.

4. Update the Does this manual have sections? toggle to YES.

5. Click Save.

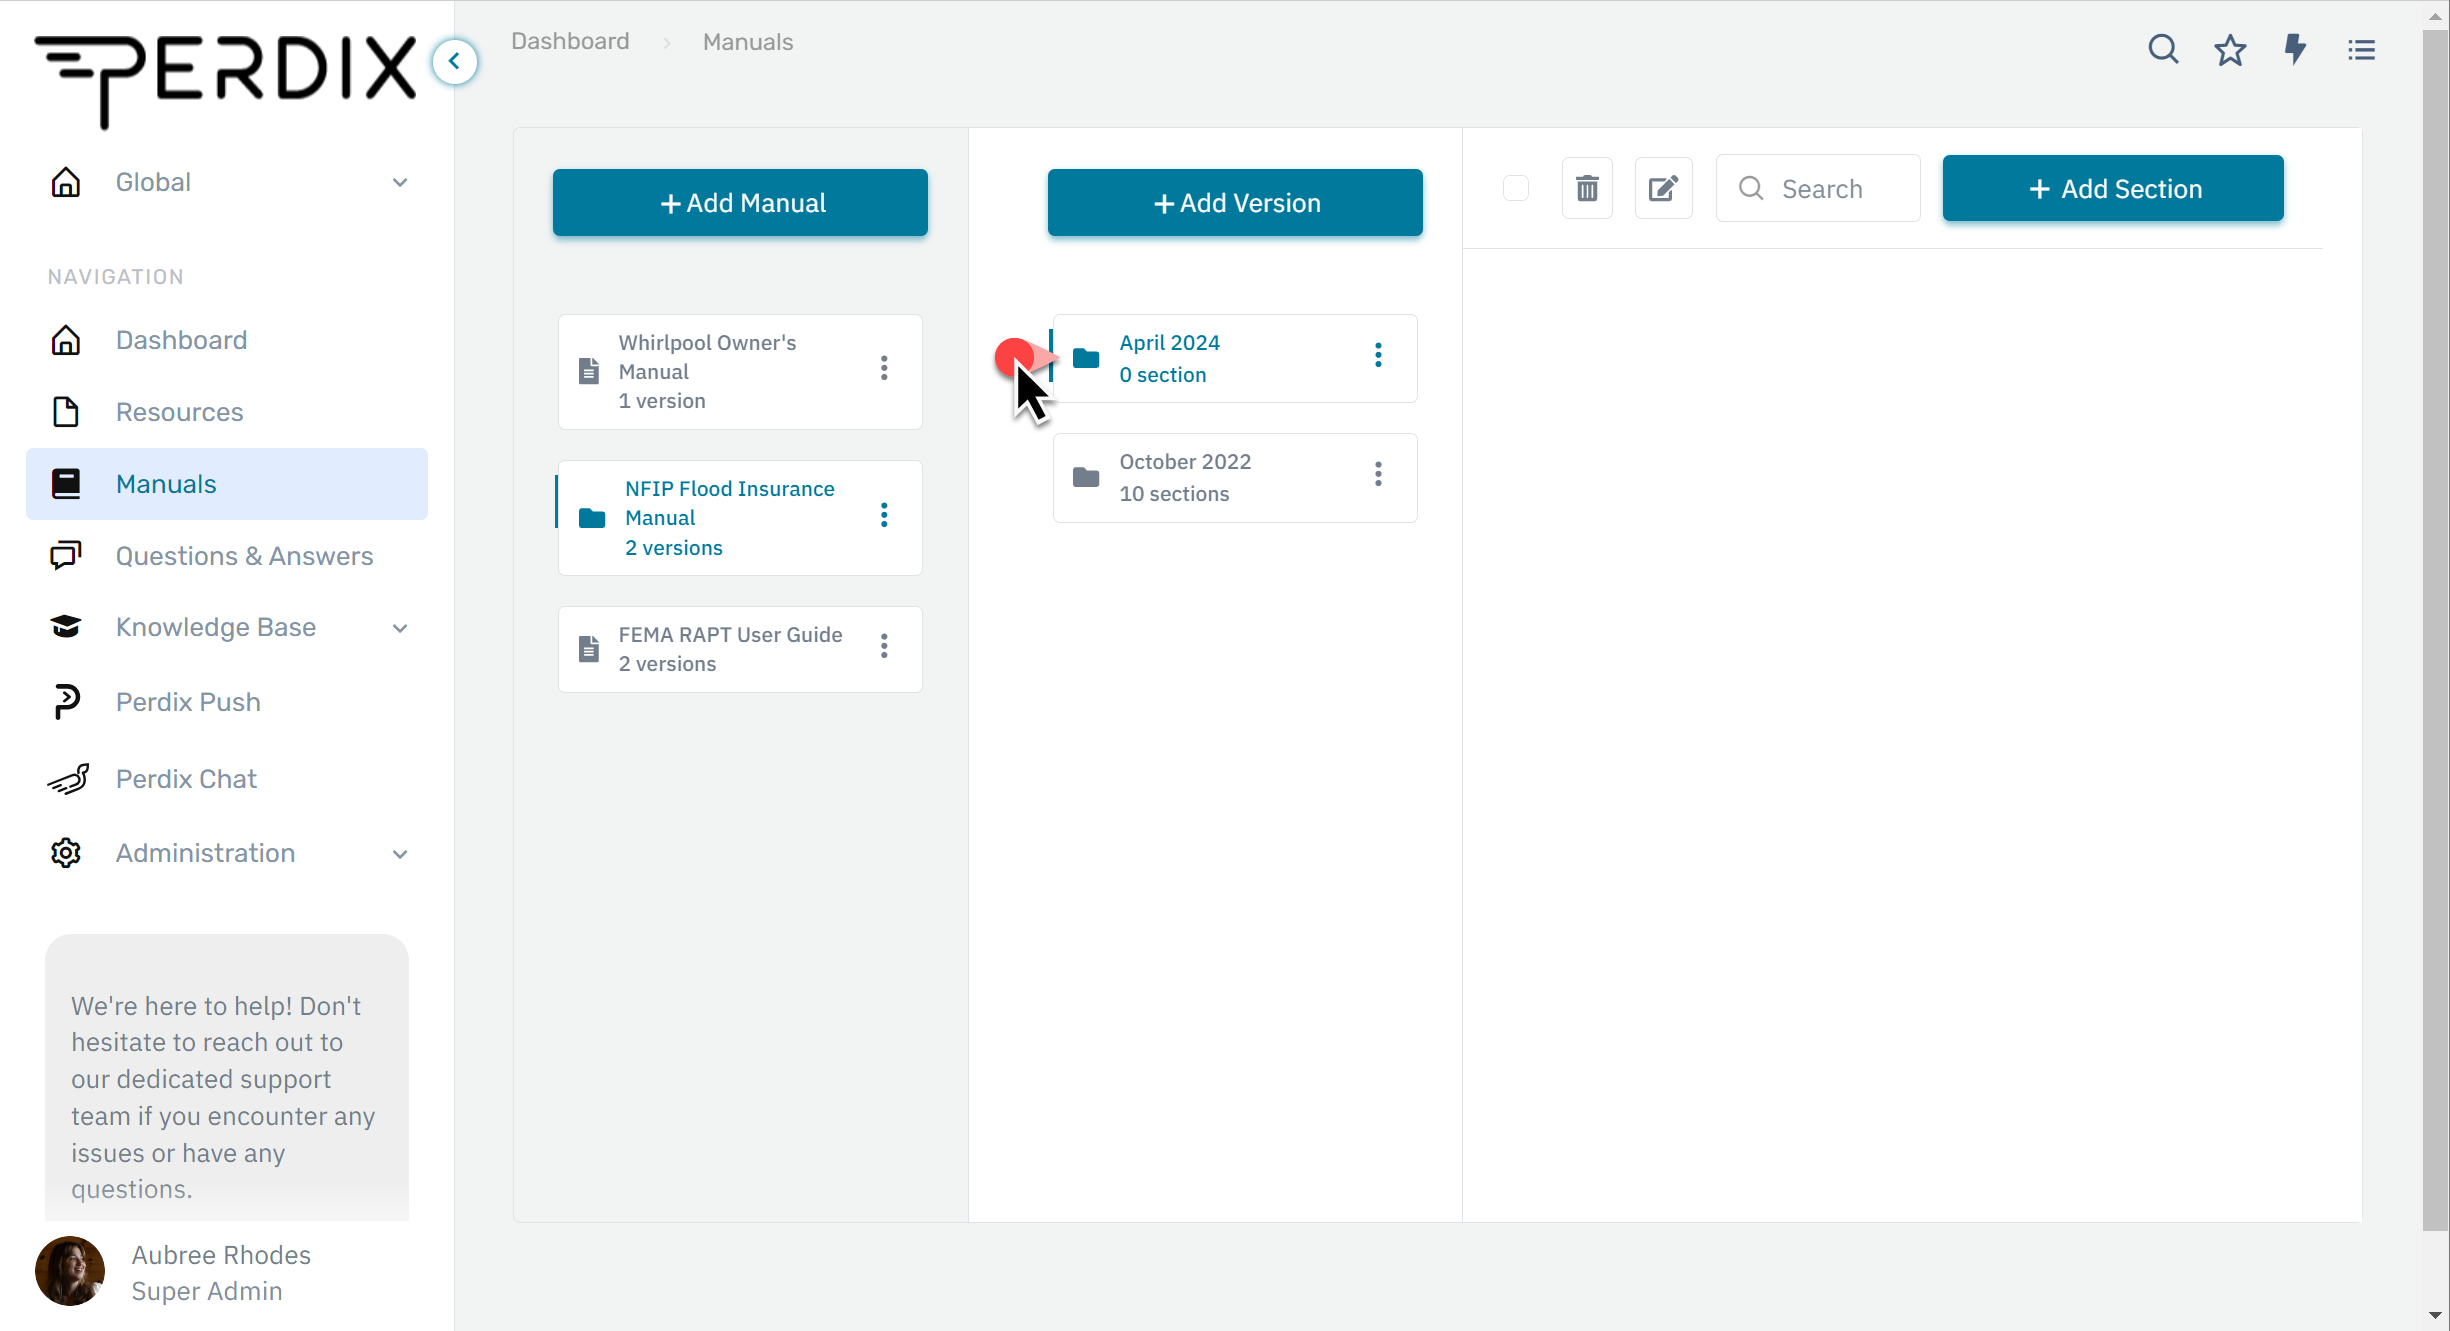
6. Select the card in the Manual List for your new manual.

7. Click the + Add Version button.

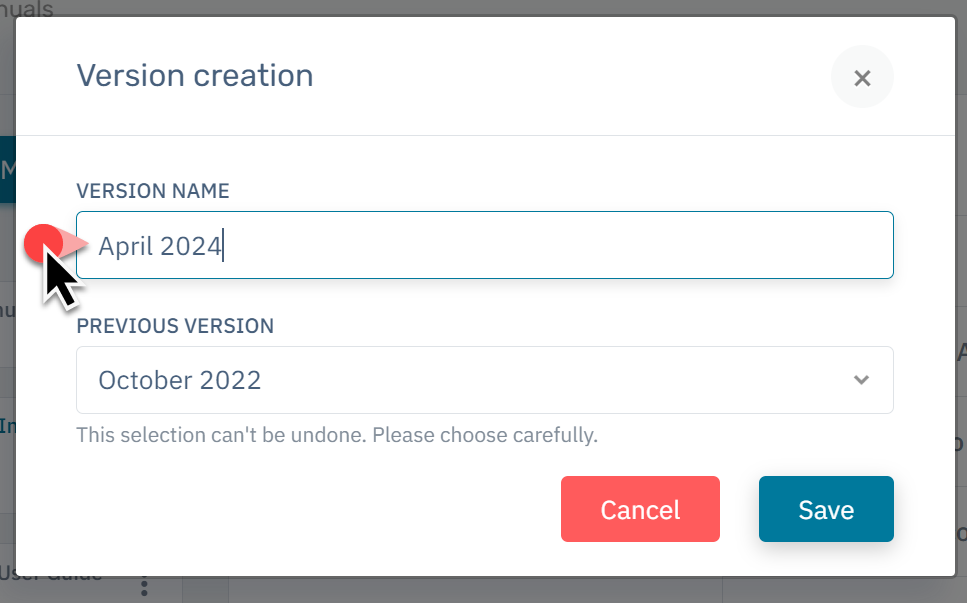
8. Enter the version name for the entire manual. Example: October 2022. If this is the first file version, leave the Previous Version dropdown empty.

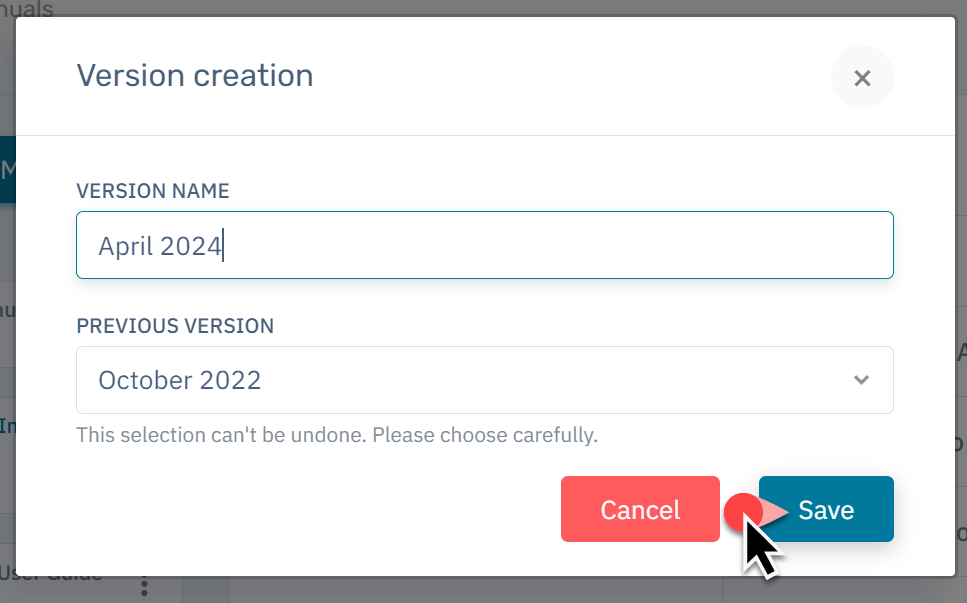
9. Click Save.

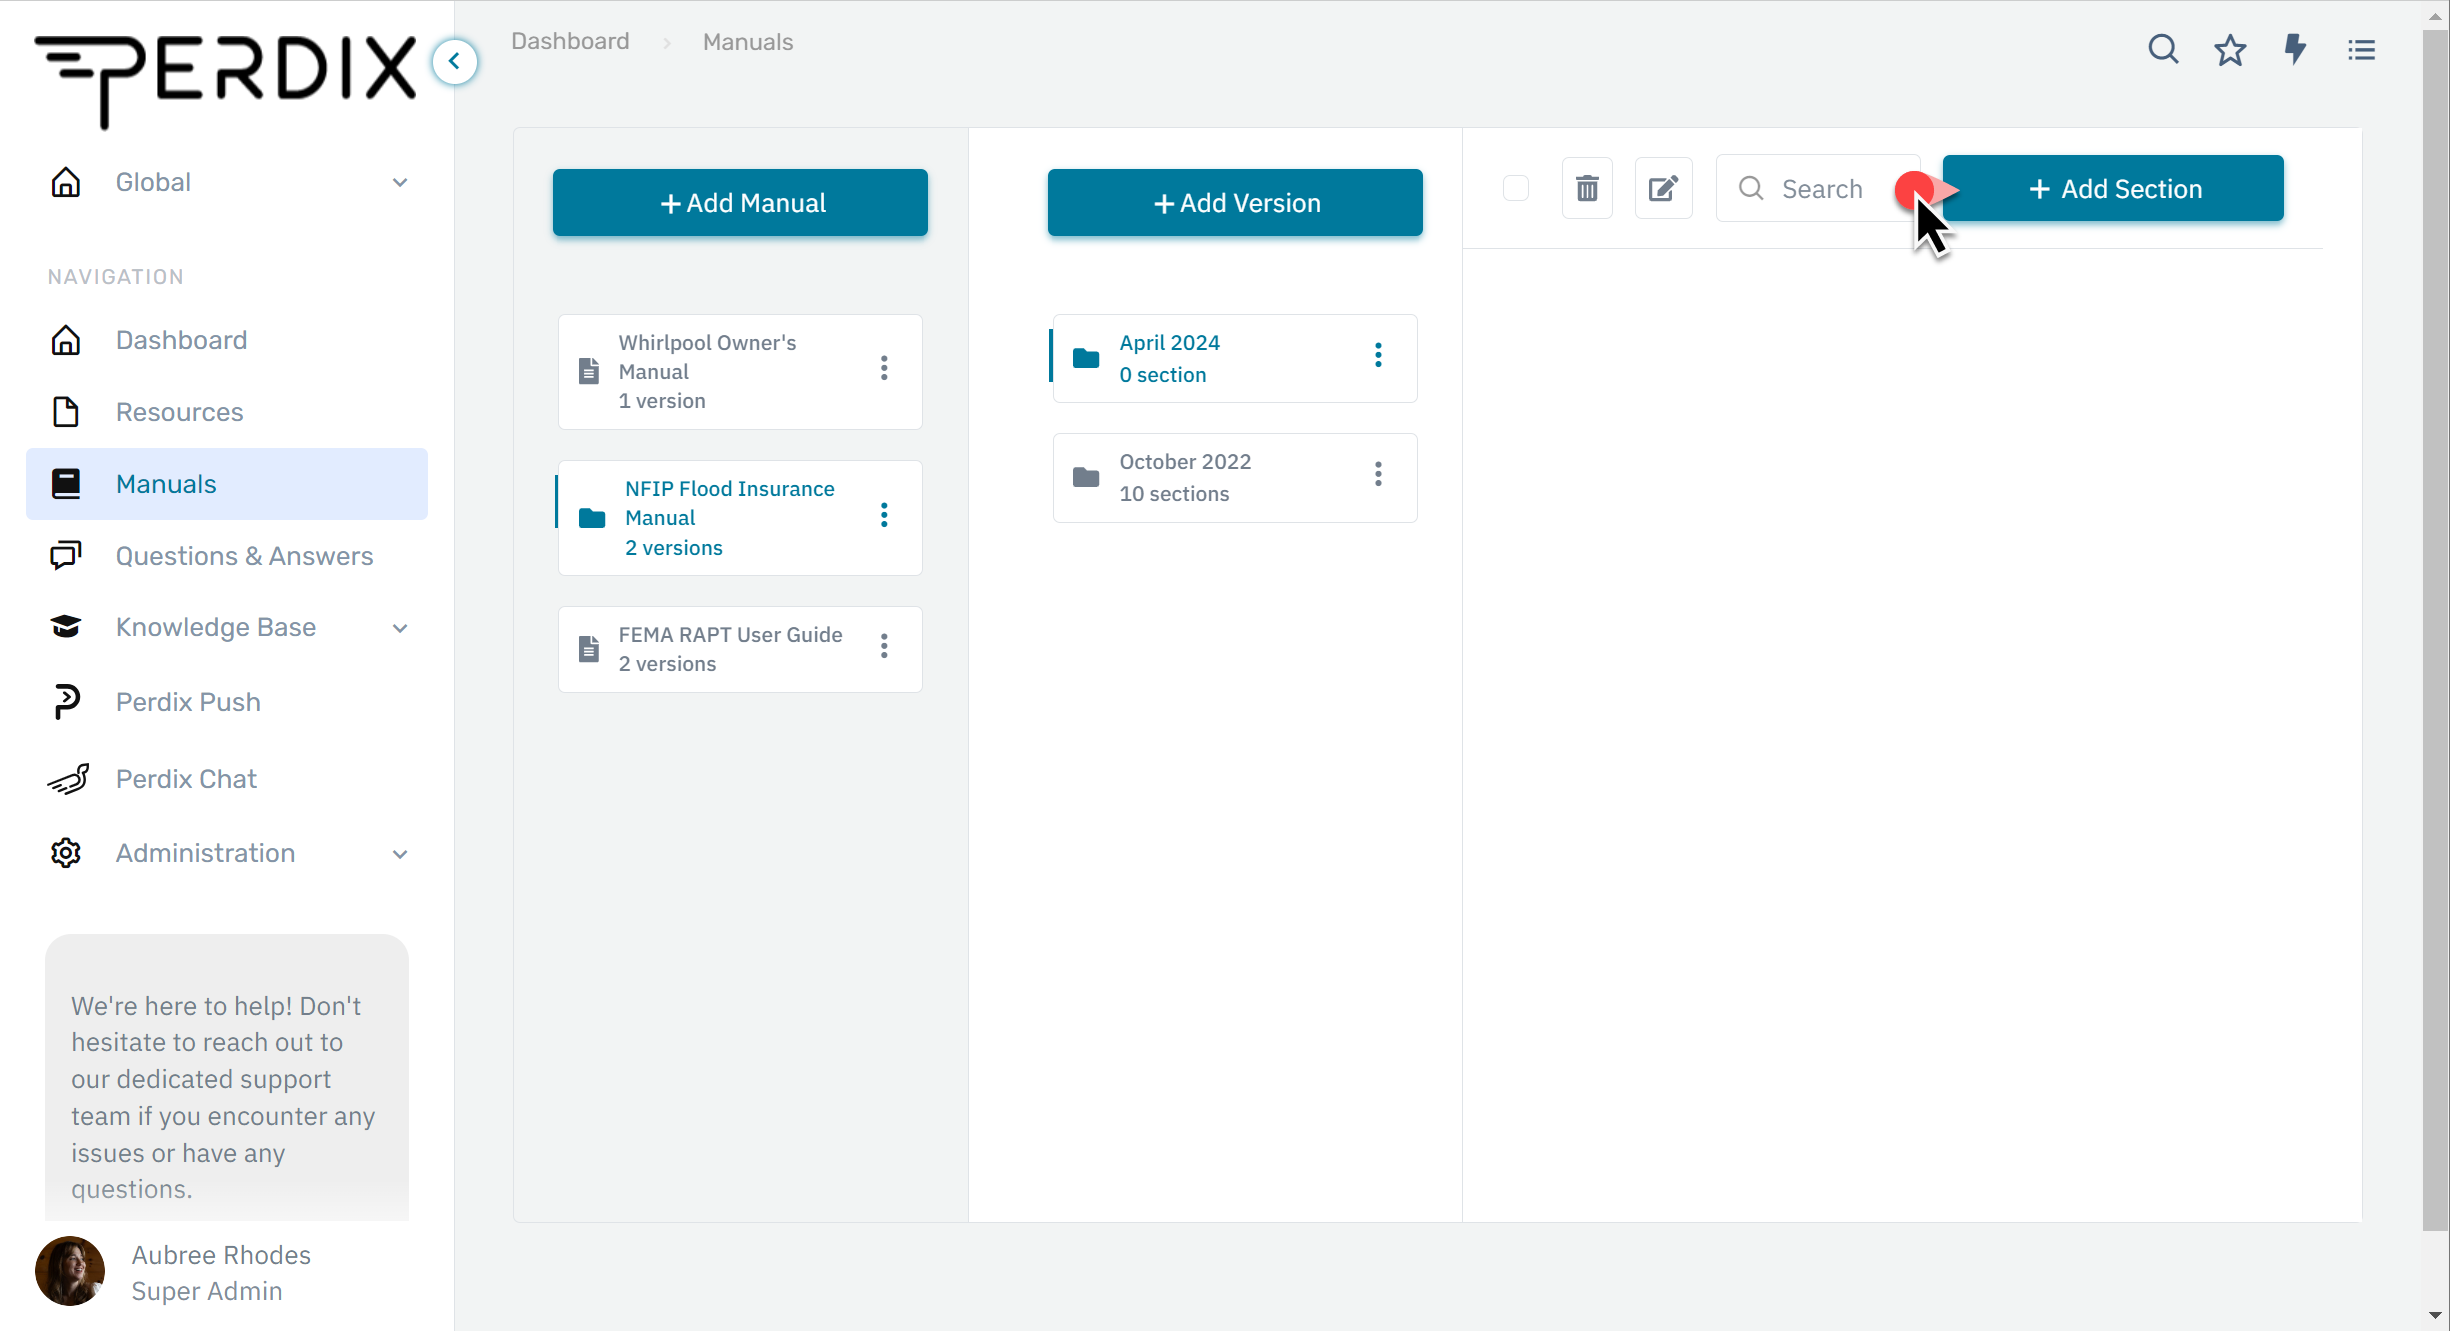
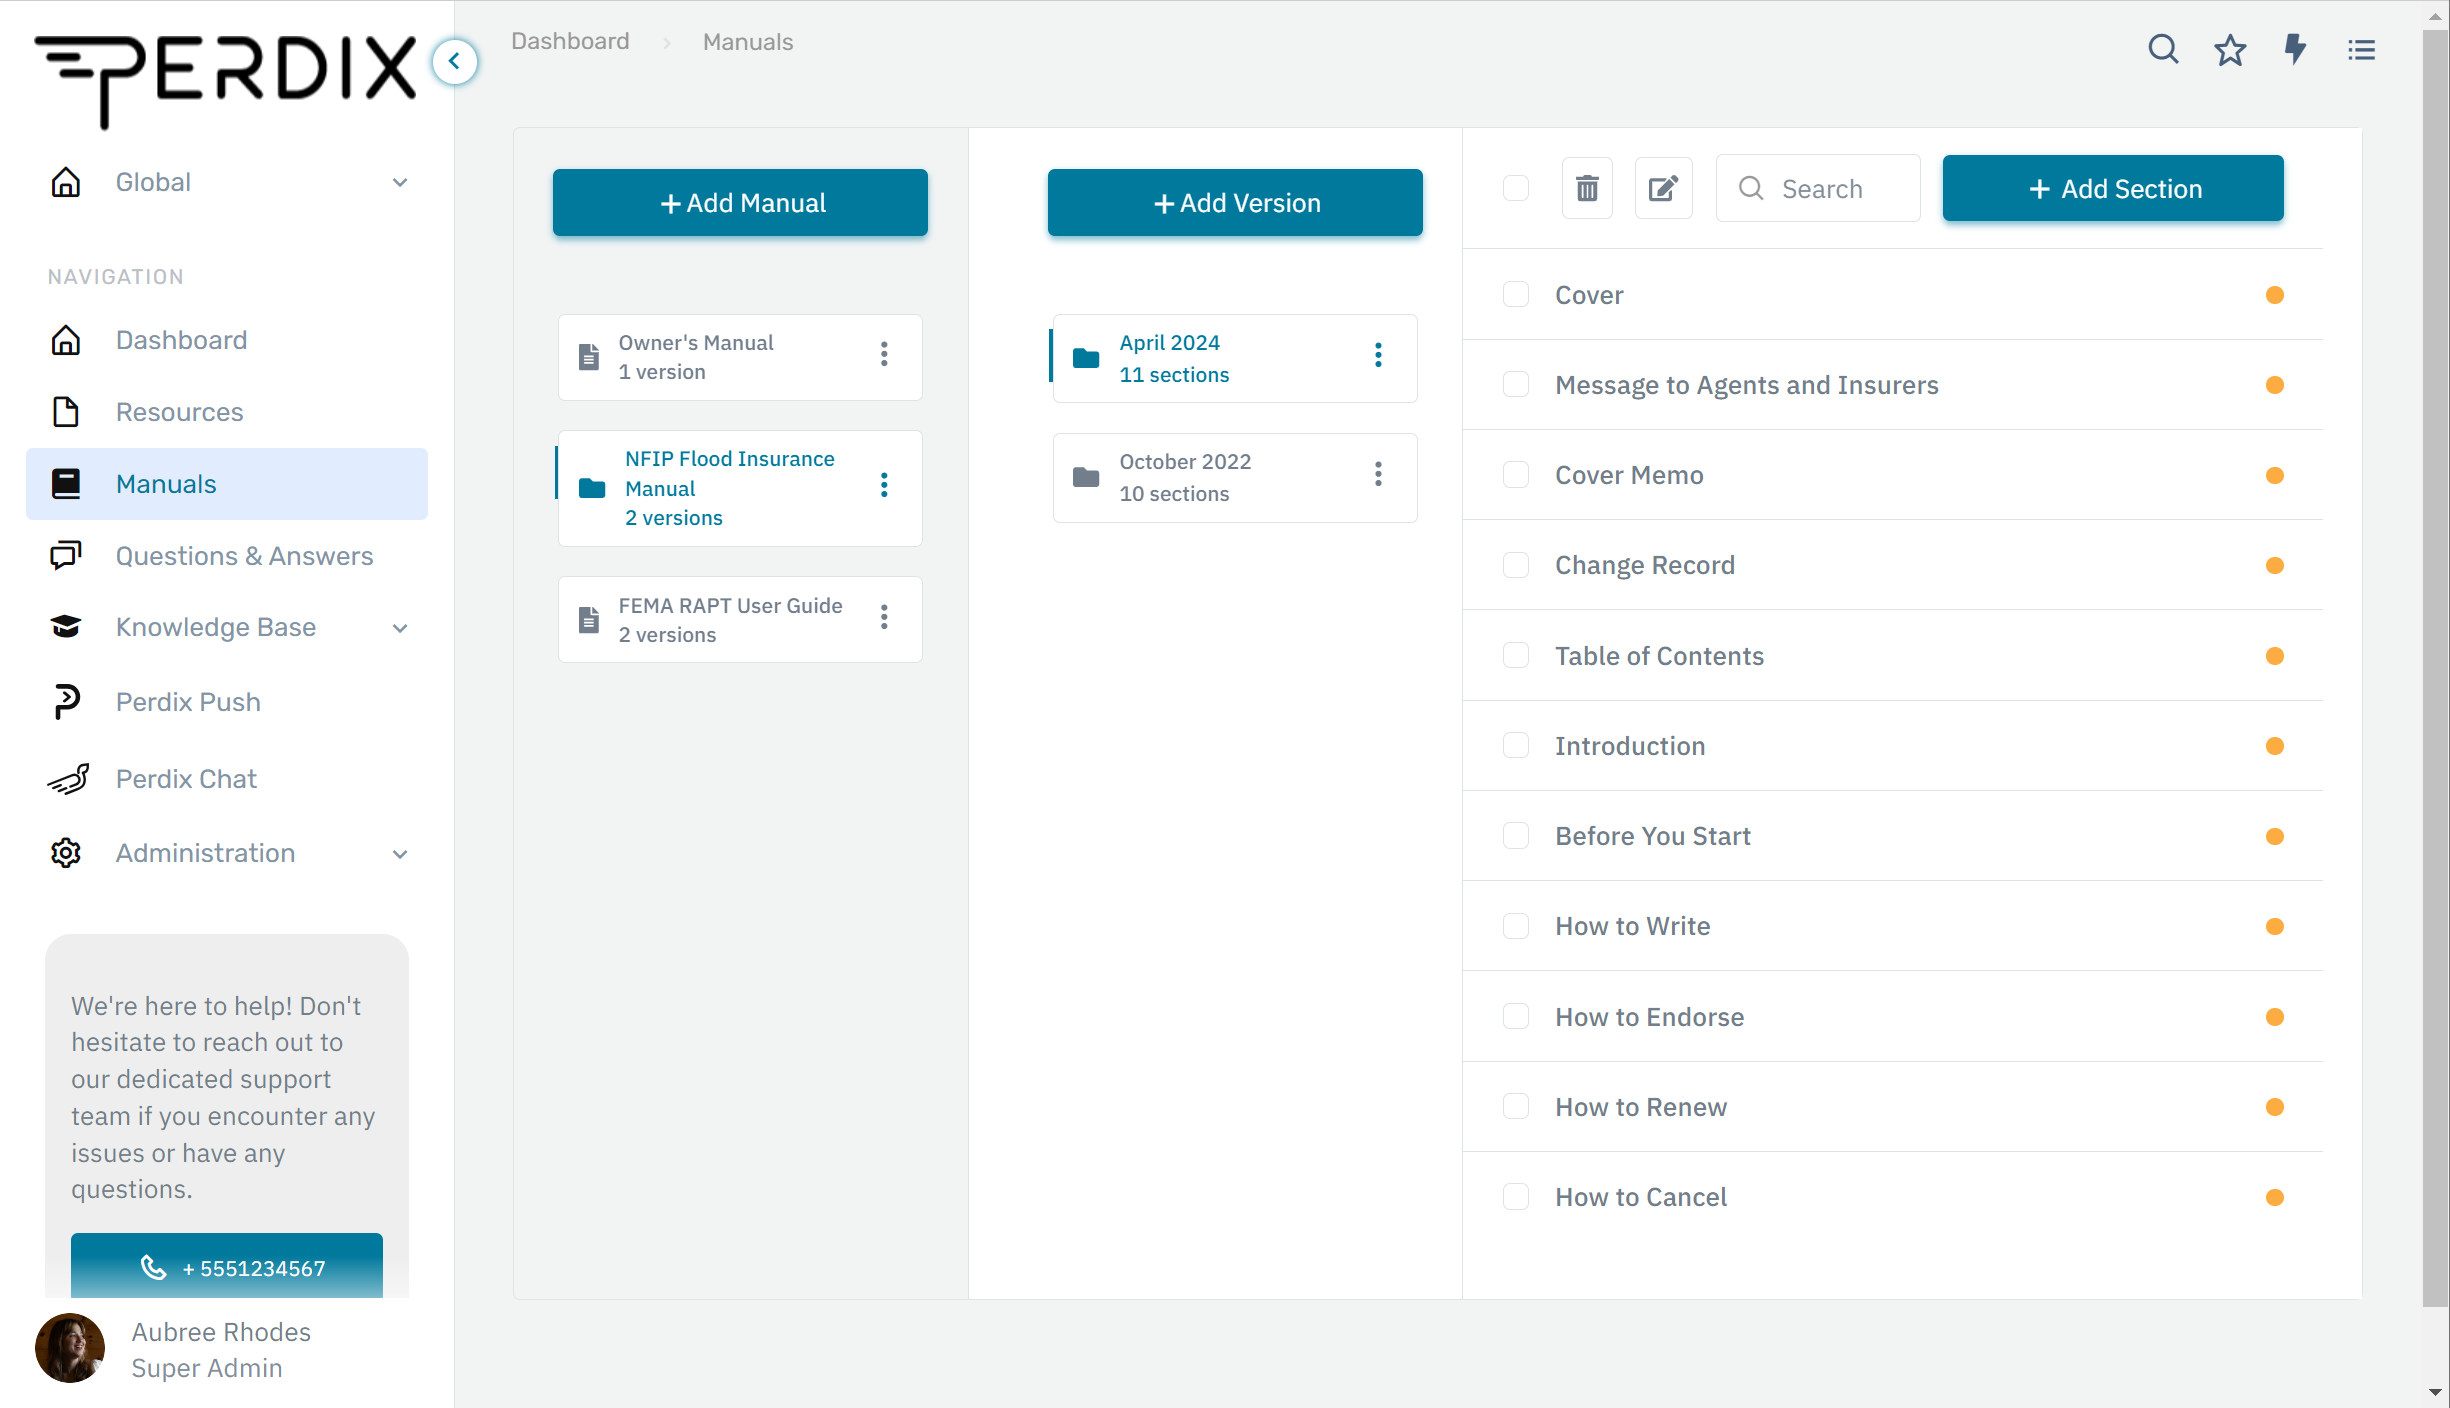
10. Select the card in the Version List for the version you just created.

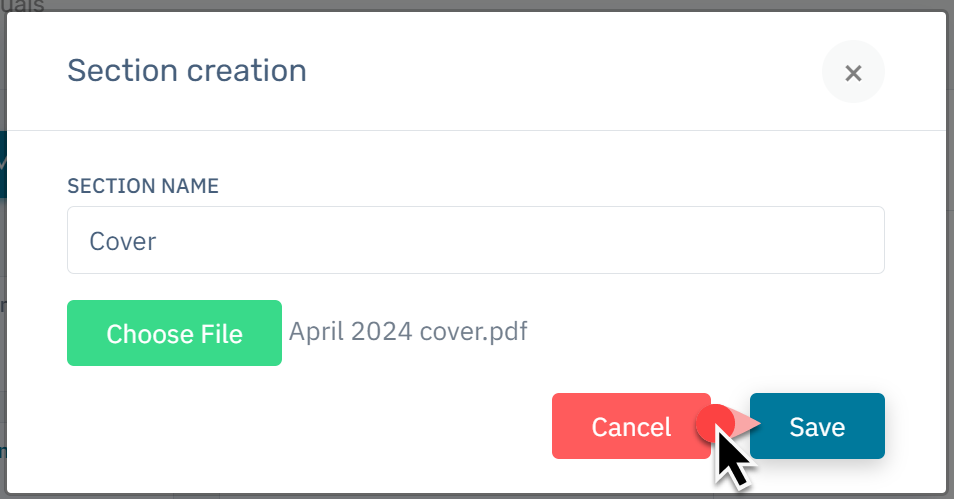
11. Click the + Add Section button.

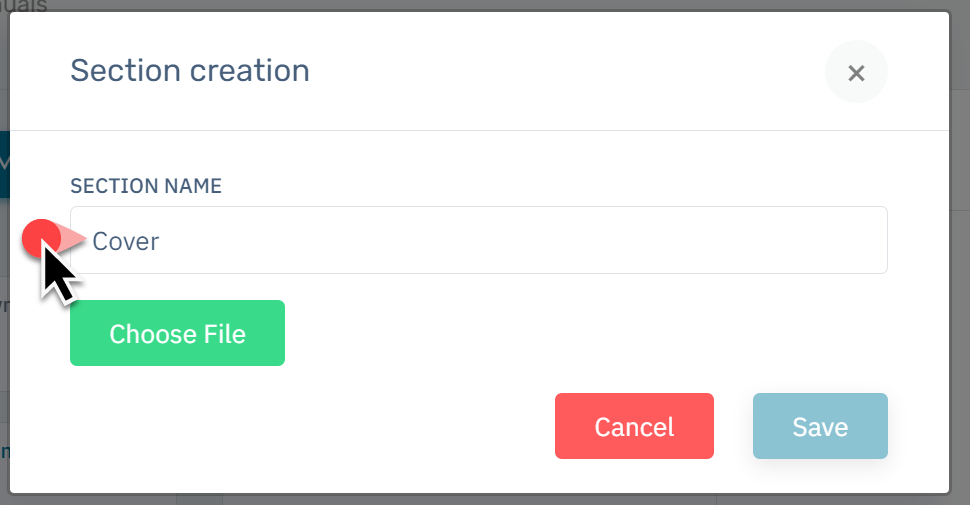
12. Enter the Section Name. This can be thought of as the document's chapter title.

13. Click the Choose File button.

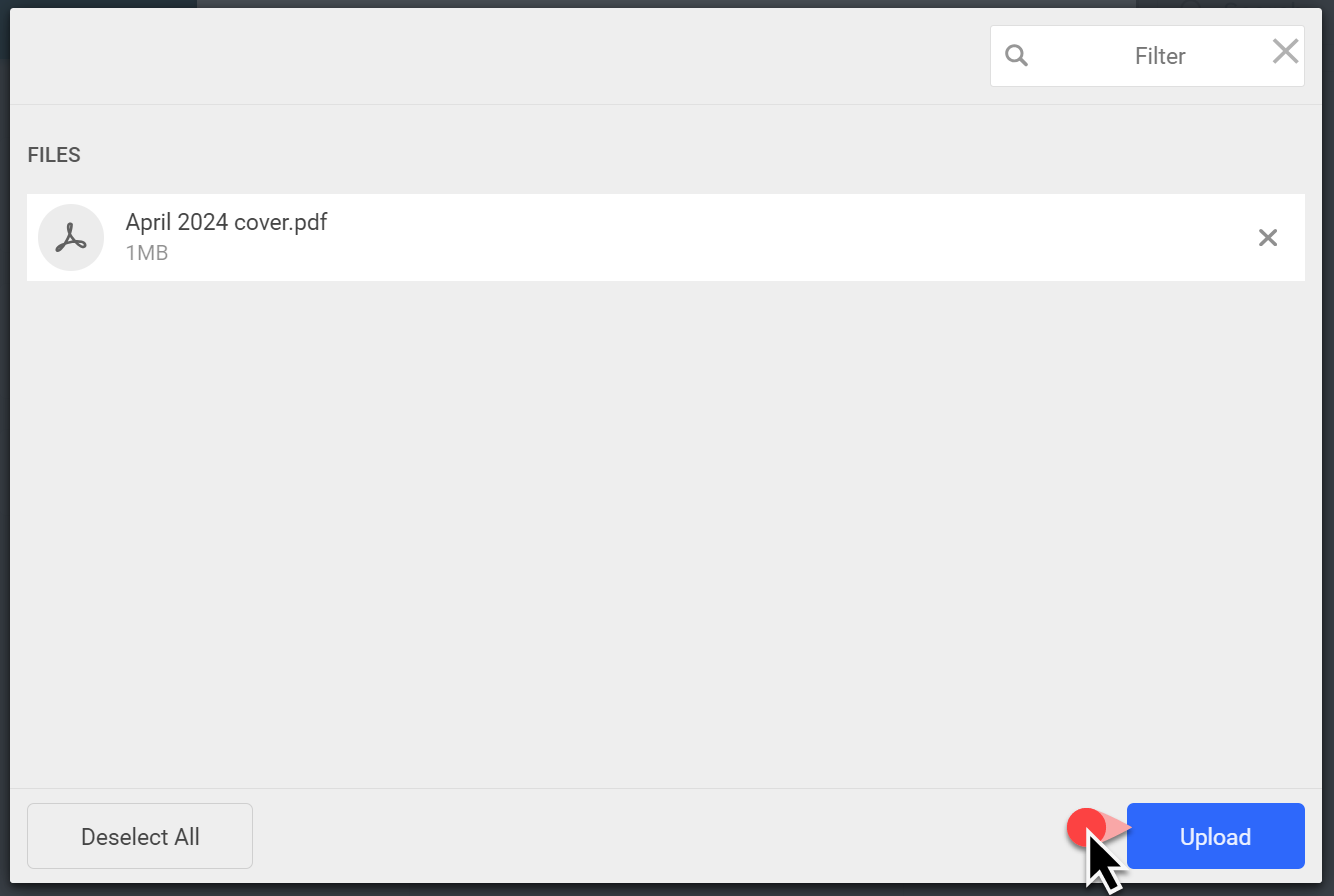
14. An upload modal will appear. Either click inside the modal to select the file from your computer's file tree, or drag and drop it directly into the uploader.

15. Click the Upload button.

16. Click the Save button.

17. Complete Steps 11 through 16 for all remaining manual sections.

The manual is now ready to annotate, and its contents will appear in search results.
The ability to create a manual without sections feature allows you to upload and organize short, more focused documents.
How it works
1. Navigate to the Manuals facet in your portal.

2. Click the + Add Manual button.
3. Enter the manual name.

4. Leave the Does this manual have sections? toggled to NO.

5. Click the Save button.

6. Select the card in the Manual List for your new manual.

7. Click the + Add Version button.

8. Enter the version name for the entire manual. Example: May 2023. If this is the first file version, leave the Previous Version dropdown empty.

9. Click the Choose File button.

10. An upload modal will appear. Either click inside the modal to select the file from your computer's file tree, or drag and drop it directly into the uploader.

11. Click the Upload button.

12. Click the Save button.

The manual is now ready to annotate, and its contents will appear in search results.
In many industries, large documents such as technical manuals, policy guides, or product specifications undergo frequent updates. These updates may be due to:
- Regulatory changes
- Product improvements
- Process refinements
- Technological advancements
Perdix's version management system is designed to handle these regular updates efficiently, ensuring that your team always has access to the most current information while maintaining a historical record of changes.
Whether you're using the "Manual with Sections" or "Manual (No Sections)" approach, you can easily manage document iterations.
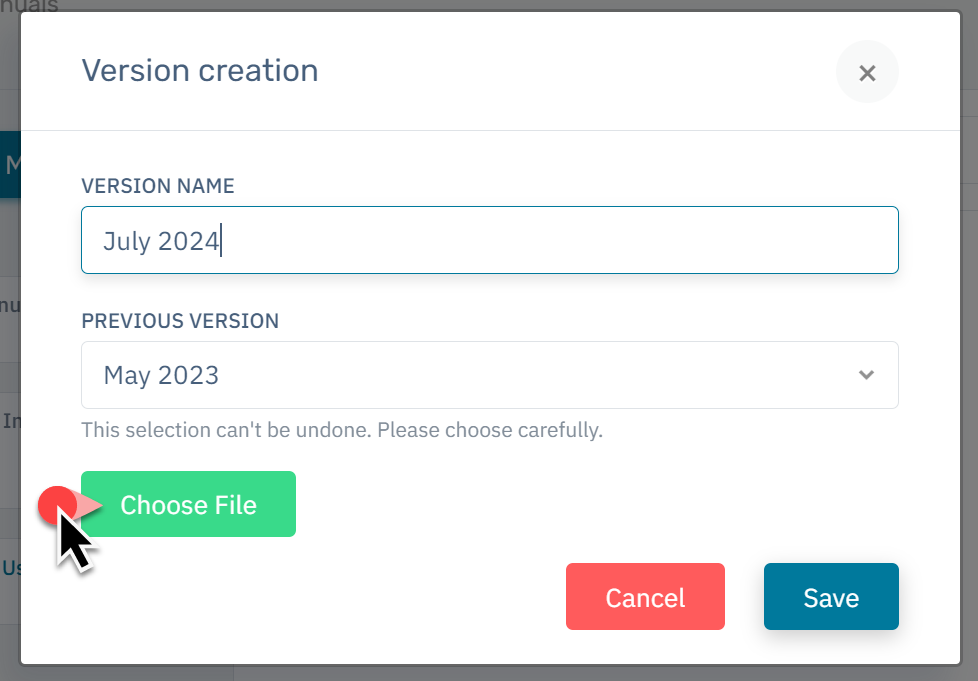
Adding a version for manuals without sections
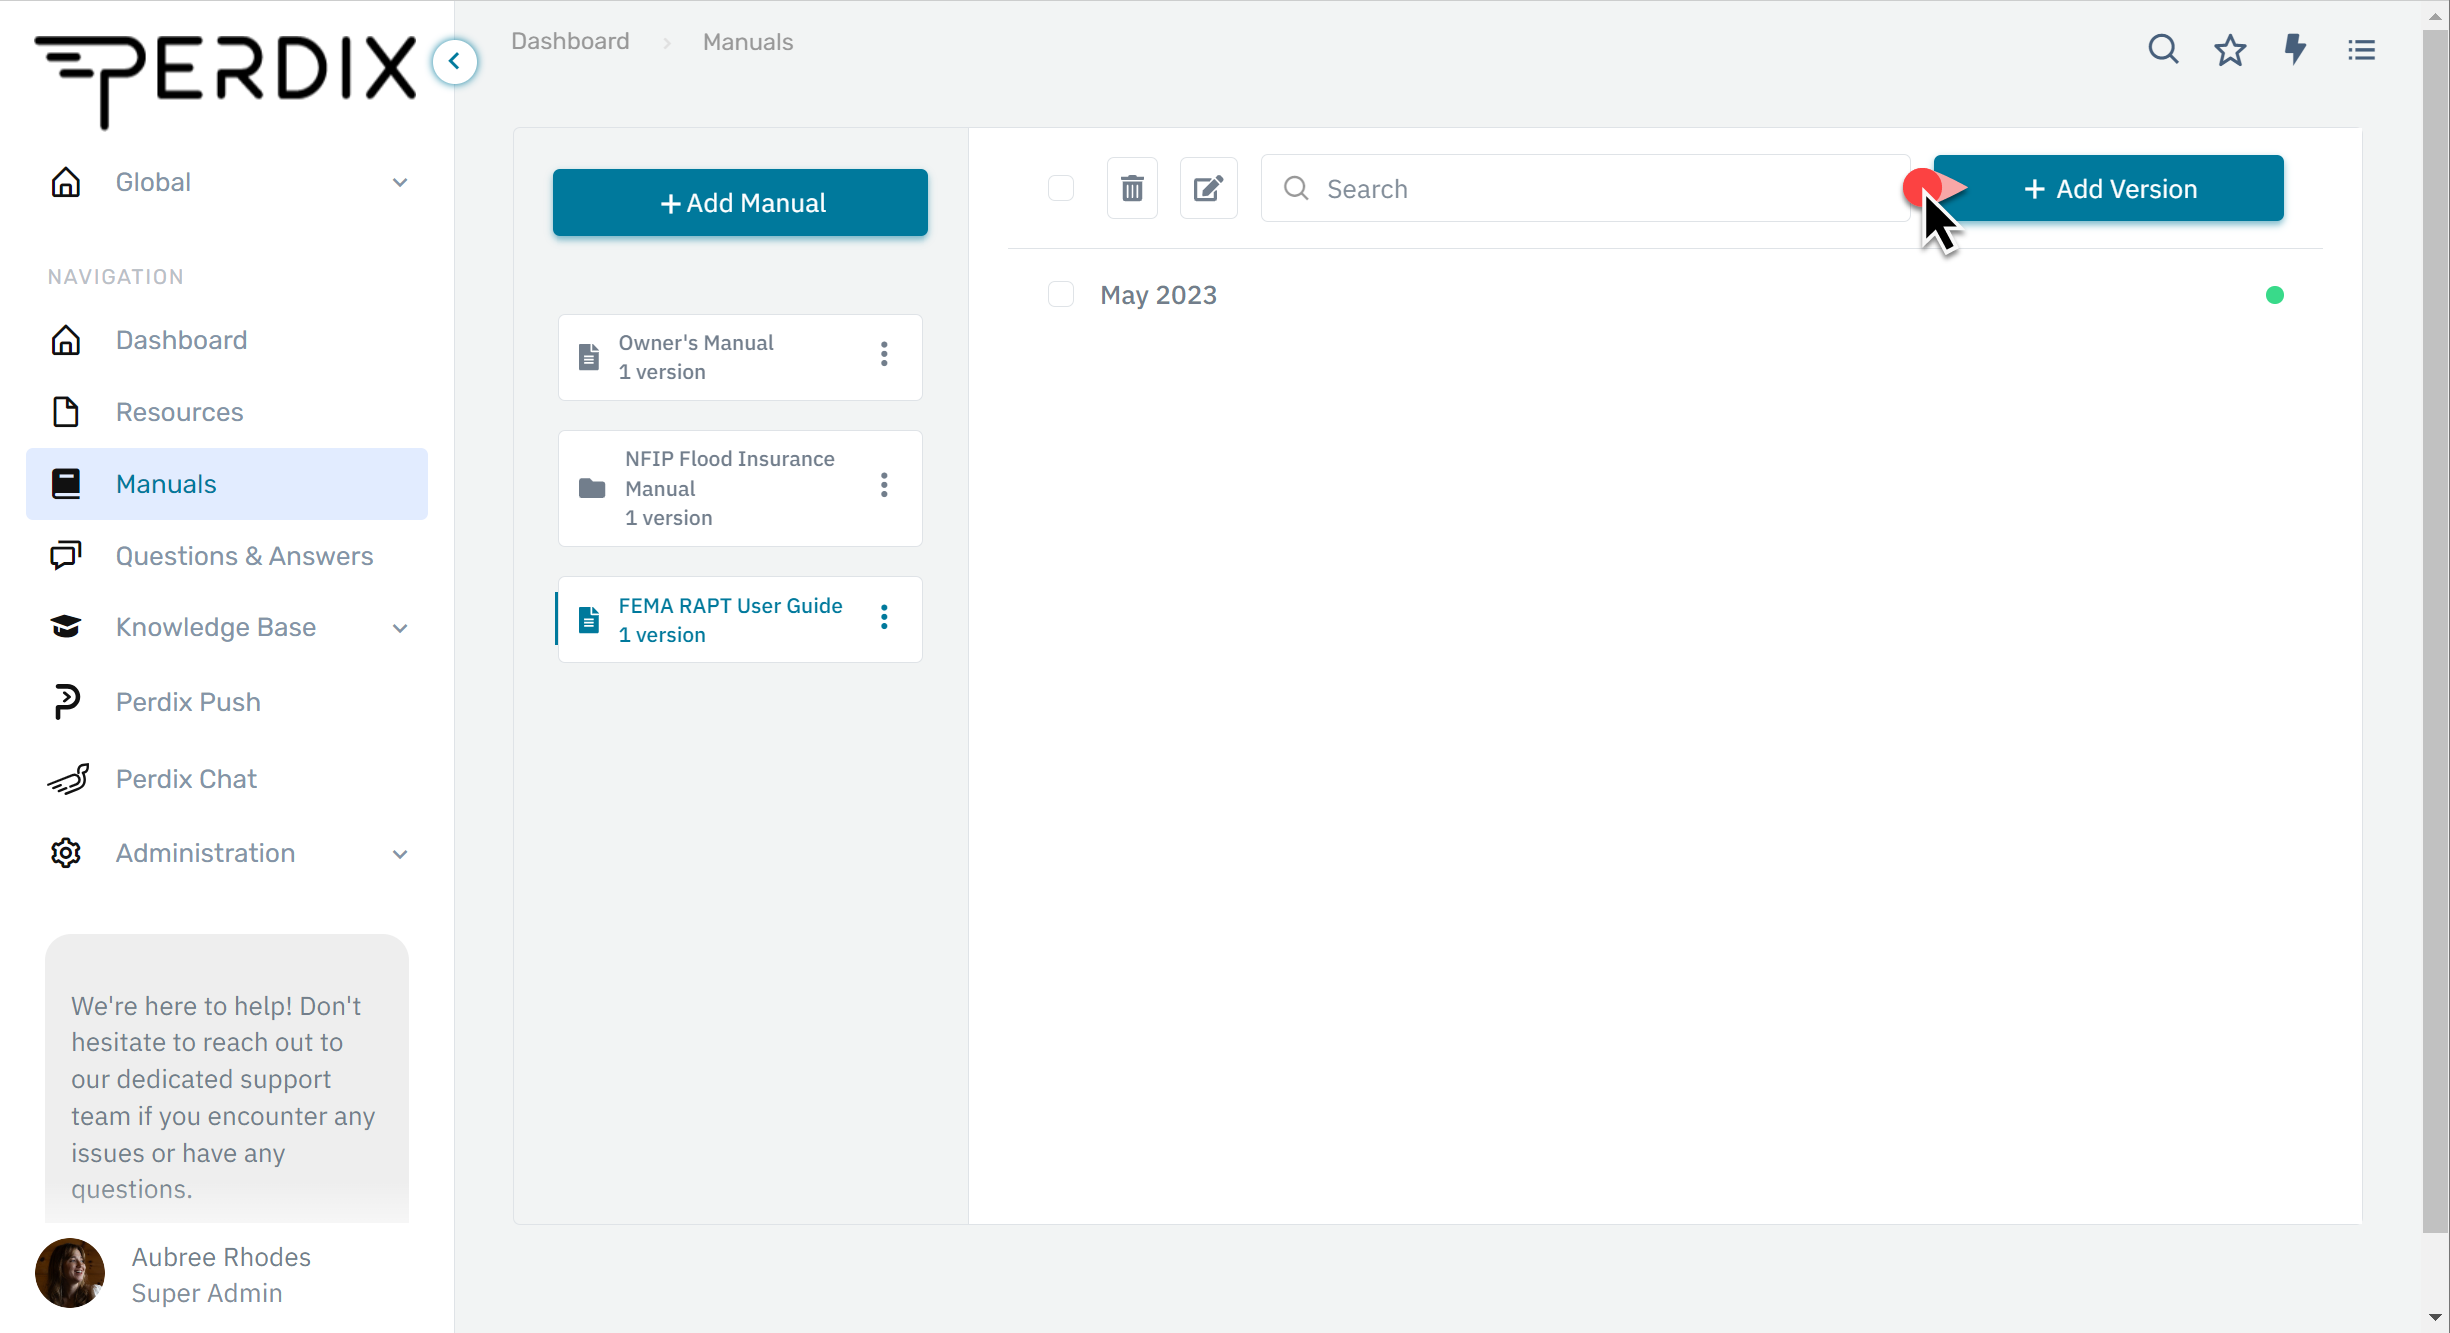
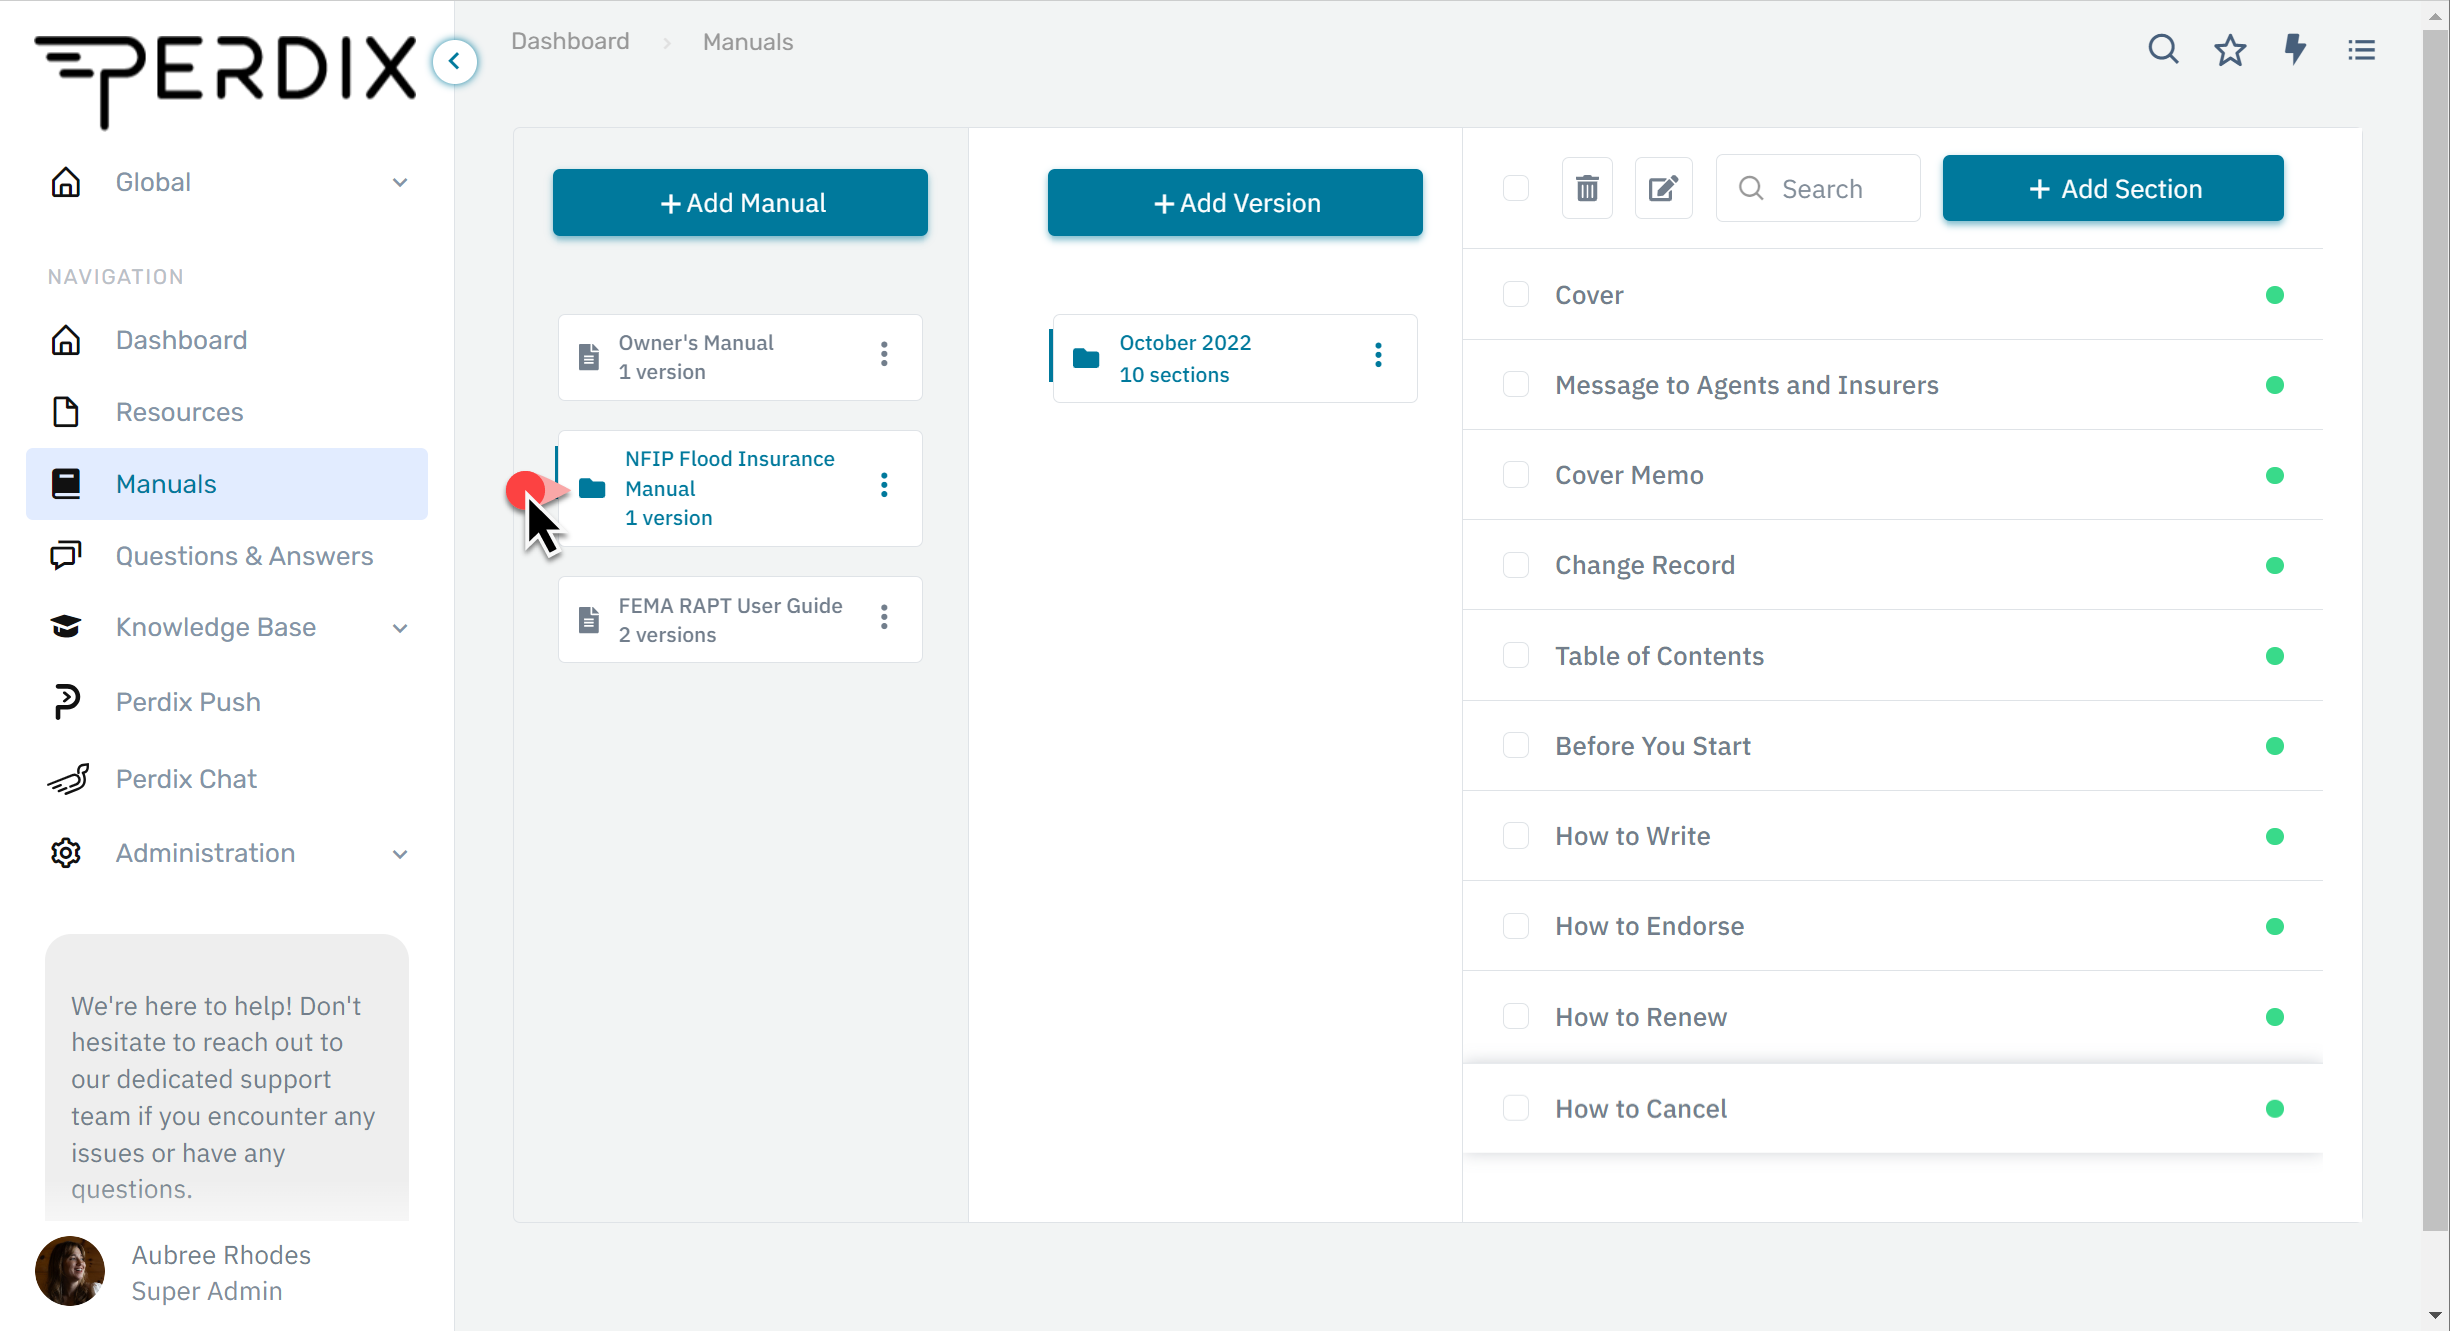
1. Navigate to the Manuals facet in your portal.

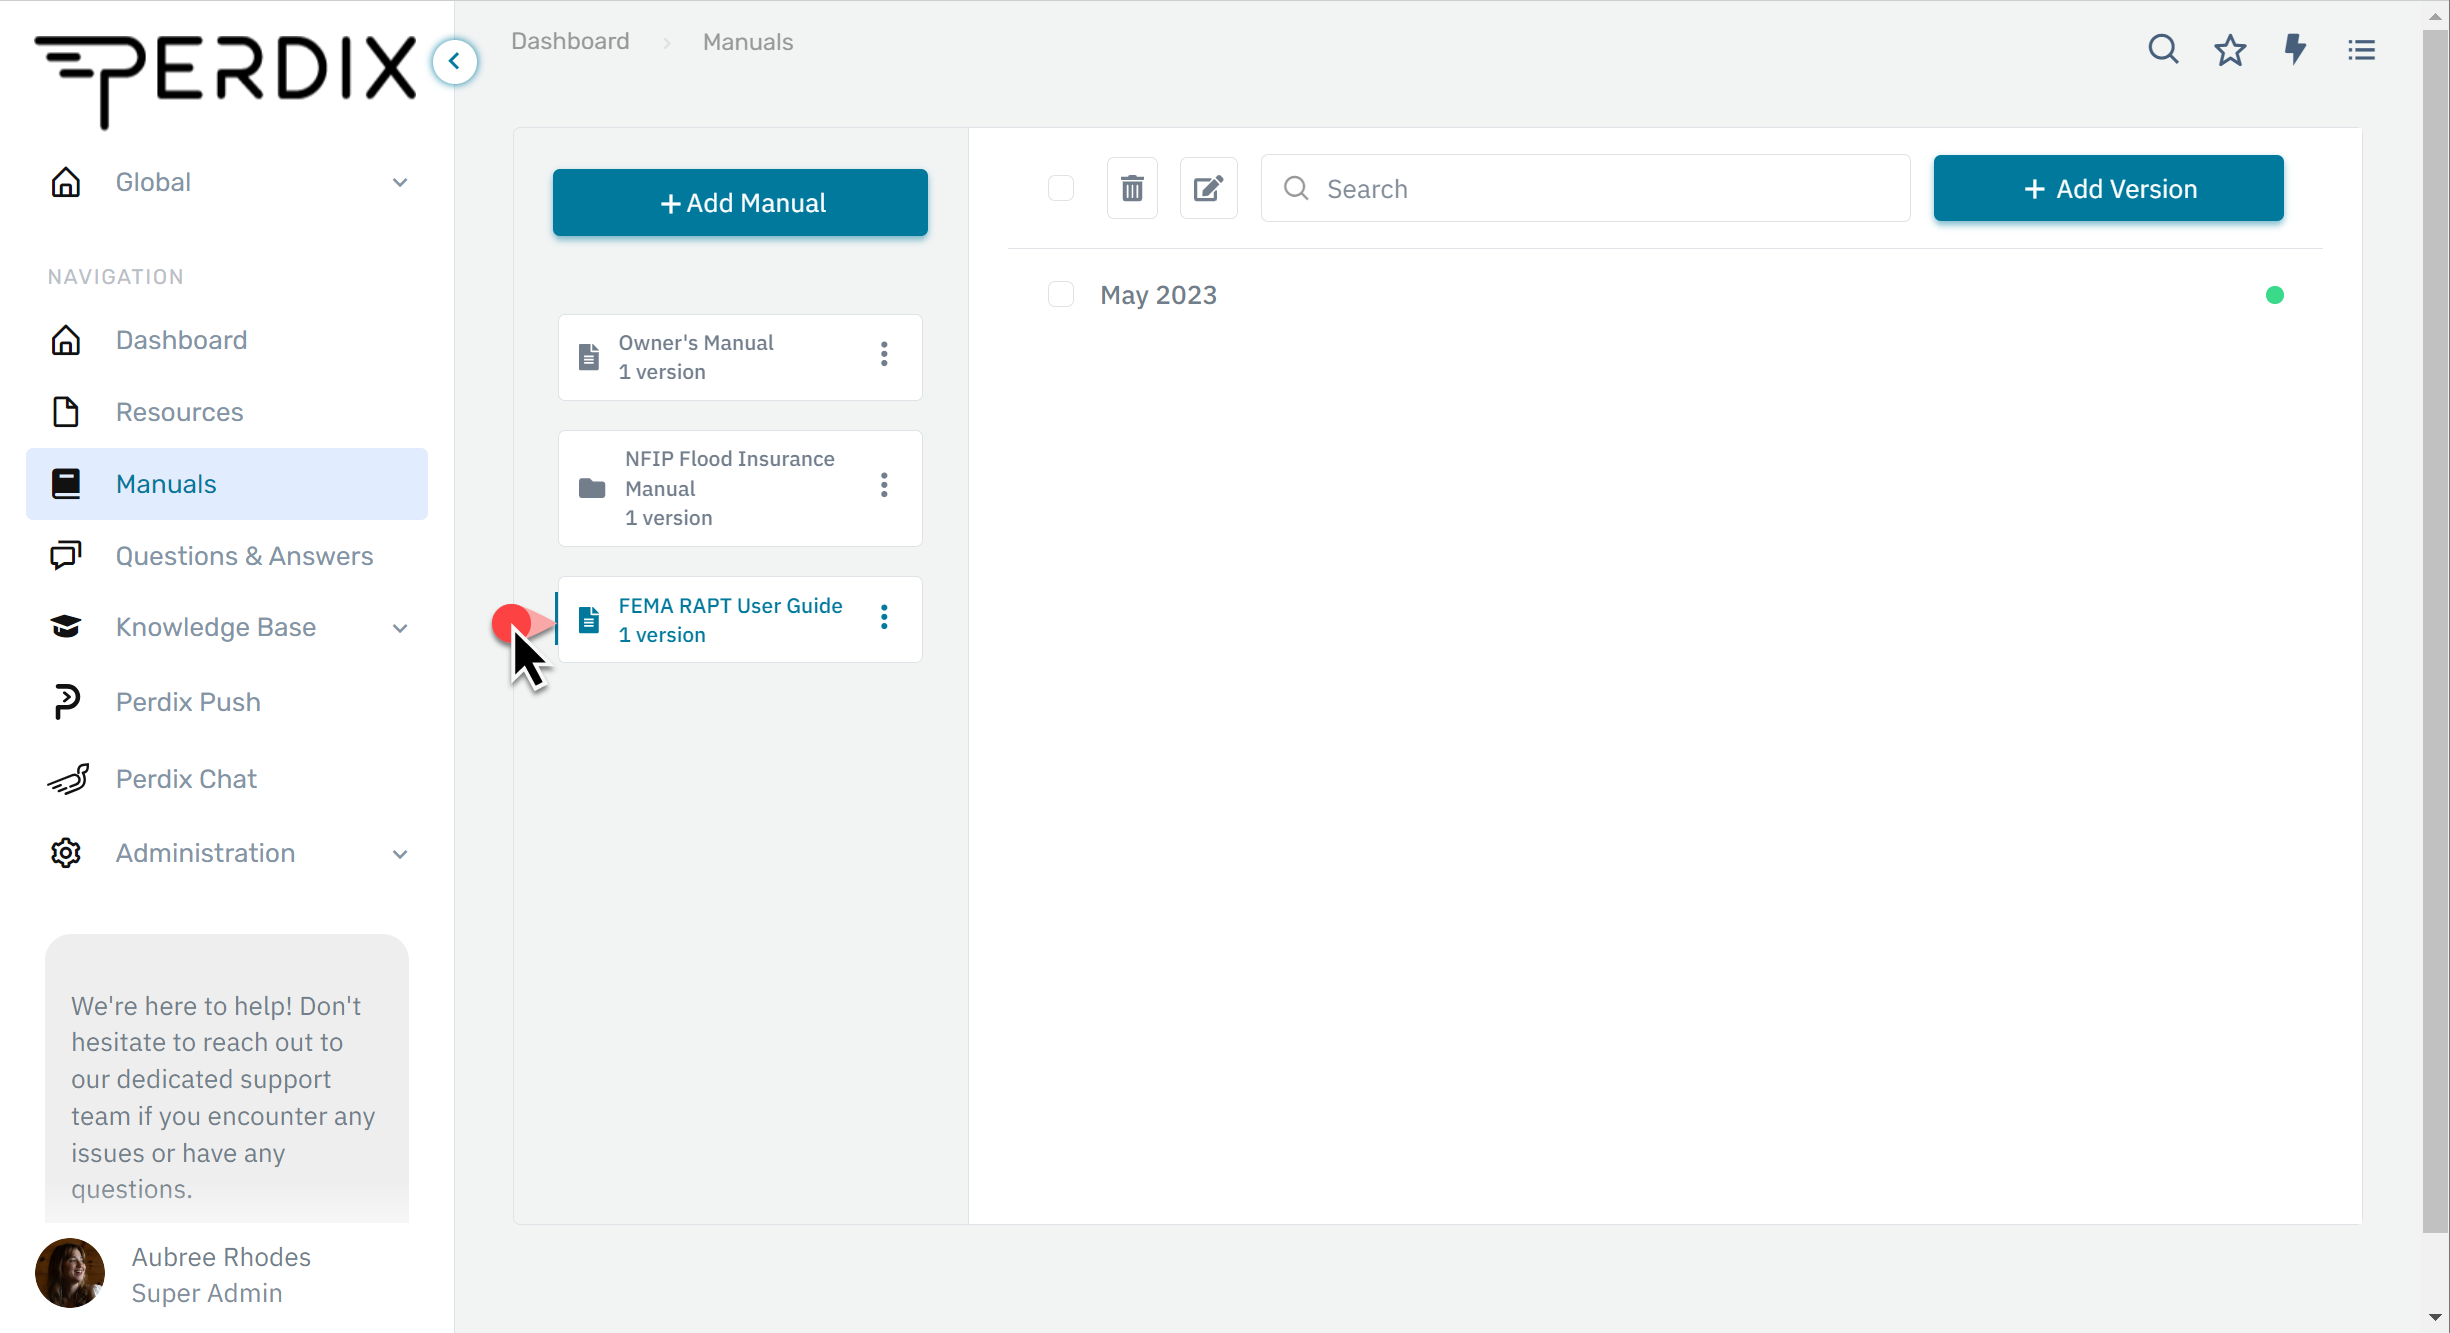
2. Select the card in the Manual List for the manual that has a new version.
3. Click the + Add Version button.
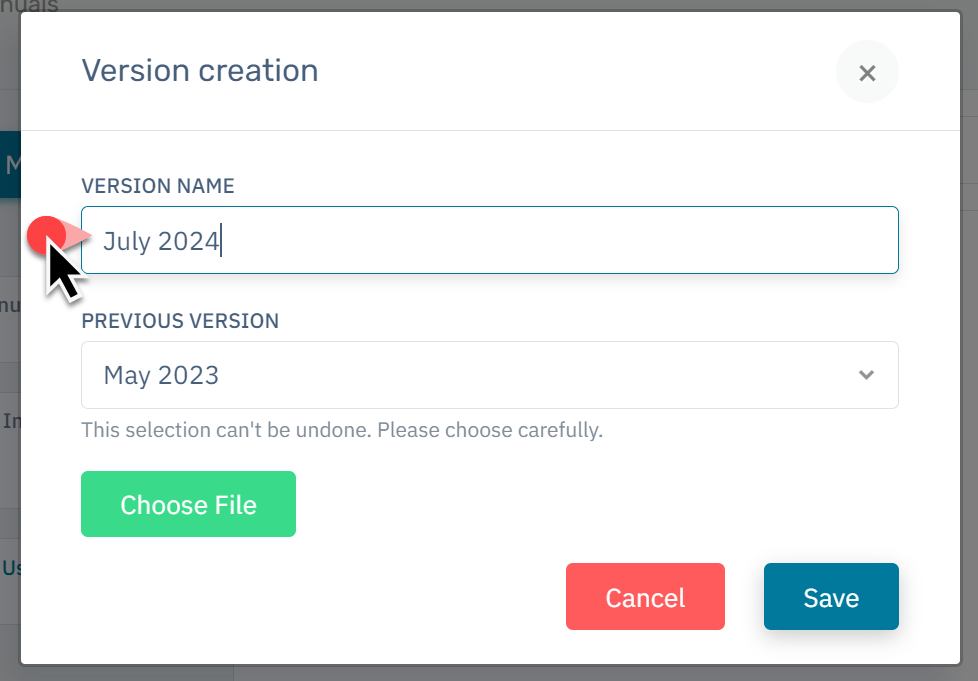
4. Enter the Version Name for the new document.
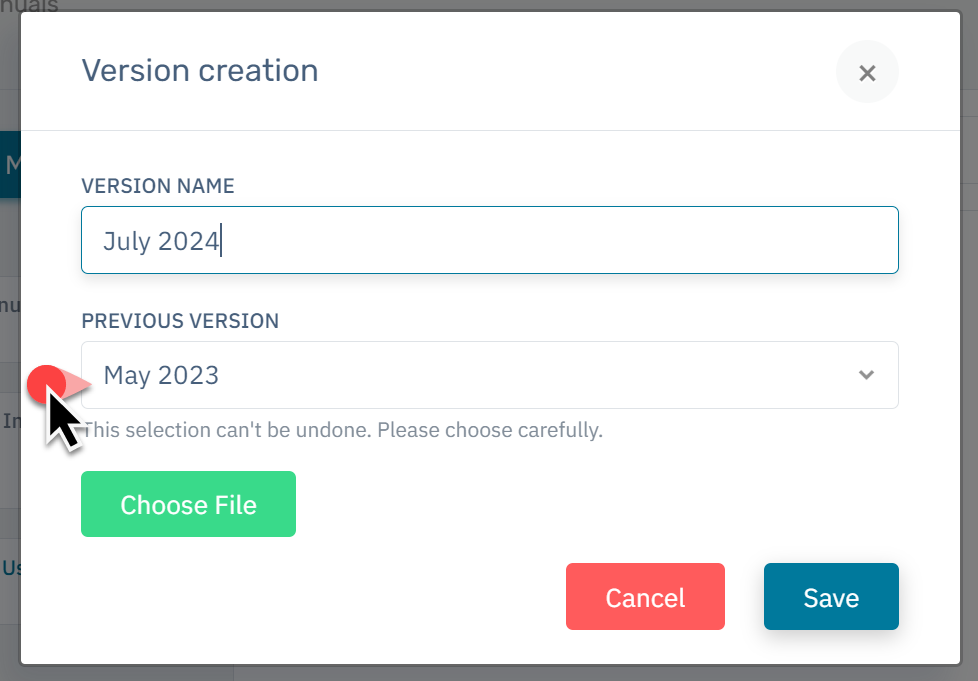
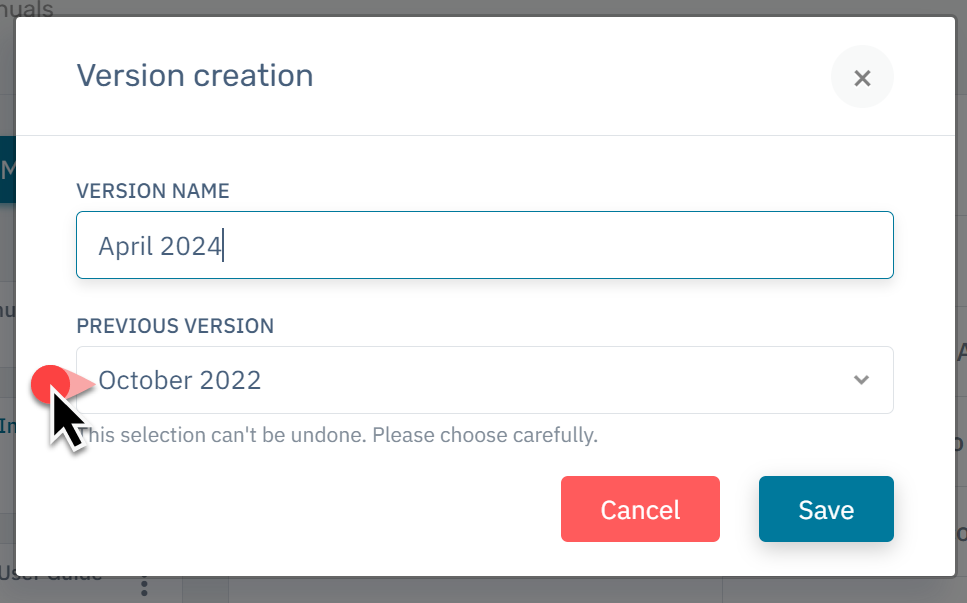
5. Confirm that the Previous Version is correct. This dropdown will default to displaying the last uploaded version.
⚠️ Note: This selection cannot be edited at a later date. Please choose carefully.
6. Click the Choose File button.
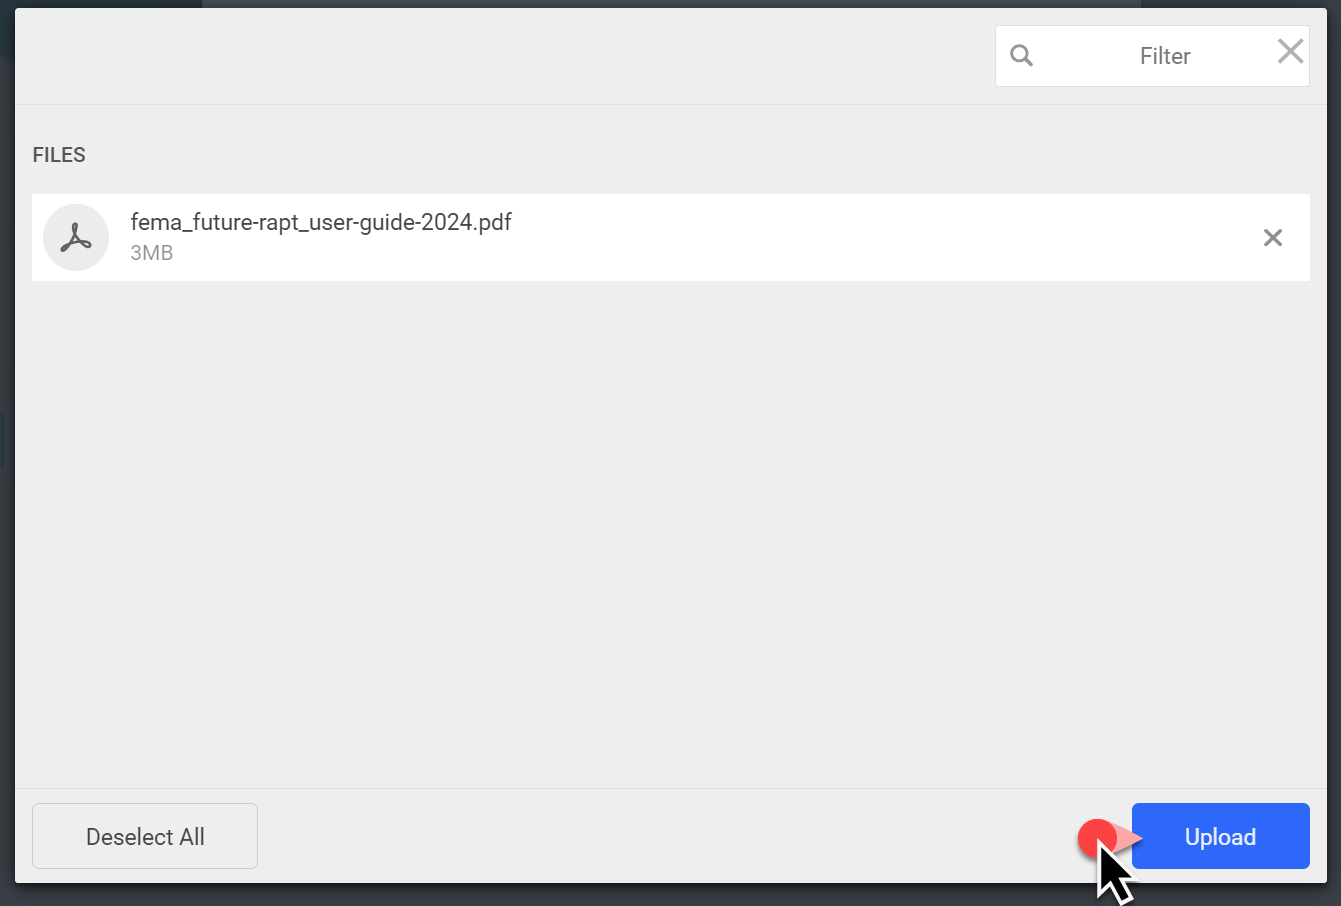
7. An upload modal will appear. Either click inside the modal to select the file from your computer's file tree, or drag and drop it directly into the uploader.

8. Click the Upload button.
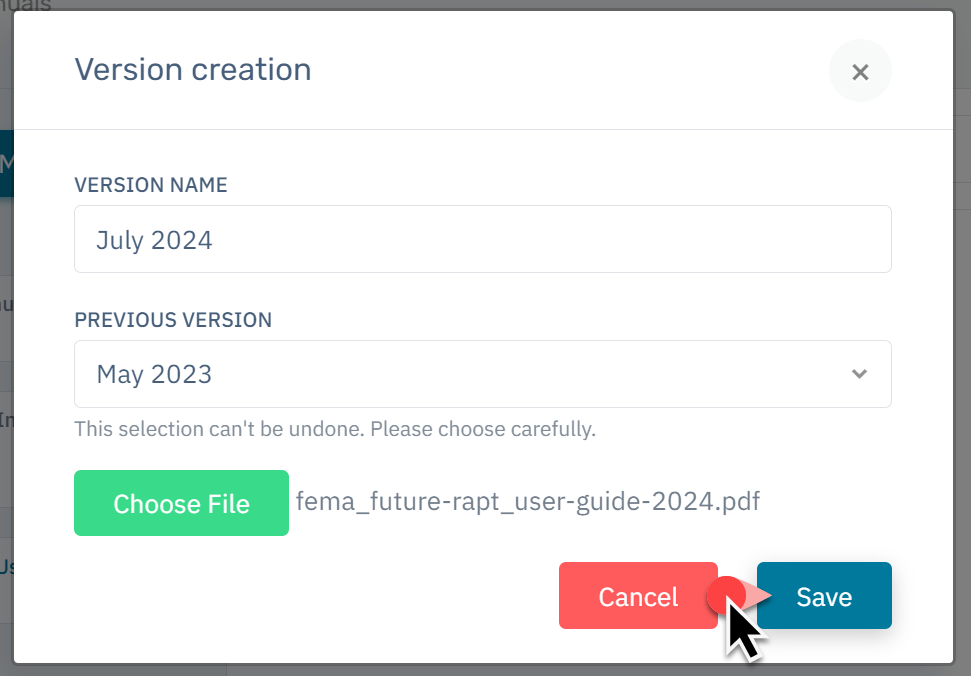
9. Click the Save button.
10. The new manual is now ready to annotate, and its contents will appear in search results.
Adding a version for manuals with sections
1. Navigate to the Manuals facet in your portal.

2. Select the card in the Manual List for the manual that has a new version.
3. Click on the + Add Version button.
4. Enter the Version Name for the new document.
5. Confirm that the Previous Version is correct. This dropdown will default to displaying the last created version.
⚠️ Note: This selection cannot be edited at a later date. Please choose carefully.
6. Click the Save button.
7. Select the card in the Version List for the version you just created.
8. Click the + Add Section button.
9. Enter the Section Name. This can be thought of as the document's chapter title.
10. Click the Choose File button.

11. An upload modal will appear. Either click inside the modal to select the file from your computer's file tree, or drag and drop it directly into the uploader.

12. Click the Upload button.
13. Click the Save button.
14. Complete Steps 8 through 13 for all remaining manual sections.
⚠️ Note: The content of these sections will appear in search results immediately, but each must be tied to its previous version inside the Annotation Reconciliation Flow to function as such.
Perdix's annotations feature allows you to create and manage digital sticky notes directly within the system. These notes offer two key benefits:
- Shareable: Collaborate with team members by sharing your annotations.
- Persistent: Annotations automatically carry over to future versions, ensuring valuable insights are preserved.
The Annotation Reconciliation feature allows you to transfer annotations from a previous version of a manual to its latest iteration. This process ensures that valuable insights and comments are preserved as your documentation evolves.
Key benefits:
- Maintain continuity of feedback across document versions
- Save time by avoiding manual re-annotation
- Ensure no critical comments are lost during updates
How to reconcile annotations
1. Navigate to the Manuals facet in your portal.

2. Drill down to the version of the manual that needs to be reconciled. Beside each section, there is now an orange indicator. This signals that the section still needs to be reconciled. Click on the indicator to open the reconcile flow.

If the section doesn't have annotations…
Determine whether or not the section has annotations that need to be migrated to the latest version.
1. If it does not, select “No, existing annotations should not appear on the new version.”

2. Select the previous version of the file.
⚠️ Note: This selection cannot be edited at a later date. Please choose carefully.

3. Click Next.

4. Since there are no annotations to migrate, the system will advance to the final Review Settings screen. Click Save and Publish to complete the flow.

5. You'll be redirected to the latest version of the file, which is now tied to the correct previous version.

If the section does have annotations…
1. Determine whether or not the section has annotations that need to be migrated to the latest version.
If it does, select “Yes, existing annotations need to be mapped to the new version.”

2. Select the previous version of the file.
⚠️ Note: This selection cannot be edited at a later date. Please choose carefully.

3. Click Next.

4. Larger files will take the system time to process. You'll receive an email once the versions are ready to compare.

5. Click the link inside the email to navigate back to the compare screen.

6. You'll be redirected to the Compare Versions tab. This screen gives you a high-level overview of the two files, including the number of pages in each version, the number of annotations in the original, and the total changes between the two. Click Next.

7. Text differences between the two files are highlighted in red and annotations that need to be reconciled are highlighted in yellow. Click on the yellow highlight to access the annotation options.

8. You'll be presented with 4 options for how to manage the annotation.

 Text Annotation Tool: Use this option to migrate text annotations from one version to the next. Clicking this button will allow you to select text the text on the new version where the annotation should appear.
 Image Annotation Tool: Use this option to migrate image annotations from one version to the next. Clicking this button will allow you to draw a shape on the new version where the annotation shoul appear.
 Skip Annotation: This option is for annotations that are no longer relevant. Clicking this button will update the annotation's color to green to indicate it's been considered.
 Pin Annotation Tool: Use this option when an annotation is no longer relevant to the current section you're working in, but should be saved to add to a different section.
9. Select the text or area on the new version where the annotation should appear, then click the Annotate button.

10. The copied annotation will appear on the new version, and the original annotation will turn green to indicate that it has been addressed.

11. If you'd like to add new annotations to the latest version of the file, use the annotation tools at the top of the PDF viewer.

12. Once you've addressed all existing annotations and added any new ones, click Done.

13. The system will display an overview of the new changes. Click Save and Publish to complete the reconcile flow.

14. You'll be redirected to the latest version of the file, which is now tied to the correct previous version. Migrated annotations will now appear on this version as well.

Behold — the power of annotation tools! You can liven up your text and images by adding noteworthy annotations. Keep them to yourself as private notes or share them publicly - the choice is yours! Only you, or a Manager or Administrator can make it public.
Within this guide, we'll take you through the steps to add, publicize, edit, and delete annotations in an existing manual.
📖 In this guide:
- Sprucing up your text with annotations
- Editing your annotations
- Deleting an annotation
- Drawing attention to images with annotations
Gear up to leave your mark on the manuals using text annotations. To do this, head over to the Manuals facet, choose the manual and version you wish to annotate and find the area to annotate.
1. Drag your mouse over the text to highlight it. A pop-up with a comment icon will appear. Click on this pop-up to open the Create Annotation Window.

2. Jot down your annotation in the text editor and then click Next.

3. Choose the relevant Tags and Teams for your annotation, then click Next.

4. Optional: Add related files to your annotation.

5. Once you're satisfied, hit the Save button.

6. To cancel the annotation process, simply click the X icon in the top-right corner of the modal.

Your annotations will stand out with a vibrant green highlight.

To edit an annotation's text, teams, tags, or associated files, hover over the highlighted text and click the pencil icon.

To make your annotation public:
1. Tap on the hamburger icon in the top left of the annotation card in the right container.

2. Switch the PUBLIC toggle to ON.

Note: The hamburger icon will appear green on a public annotation.
Need to say goodbye to an annotation that's no longer relevant?
1. Tap on the hamburger icon in the top left of the annotation card in the right container, and click Delete.

2. A modal will appear asking you if you're sure you want to delete the annotation. Click Yes.

Annotating images in Manuals works similarly to text, with a minor difference at the beginning.
1. To add an annotation to an image, click on Shape Tool at the top of the PDF Viewer. You can select what shape you'd like the annotation to be: a rectangle, circle, or even draw your own custom shape!

2. Use the selection cursor and drag it over the image or the section you wish to annotate.

3. Click on the Annotation Button that appears, and proceed like you would with a chat annotation.

Your new annotation will appear on the manual in green.

With these tools in your annotation arsenal, your manuals are going to be delightful repositories of rich information. Embark on your annotation journey now!
The Resource facet houses a curated trove of resources neatly arranged in tagged folders awaiting your exploration.
Within this guide, we'll take show you how to effectively explore the Resources section, give you an overview of your abilities while viewing a resource, and show you how to create new resources.
📖 In this guide:
- Navigating the Resources section
- Resource detail page
- Creating resources
1. Click on the Resources icon in the left navigation menu.

2. Use the TAG FILTER to filter the resource list to only display files with specific tags.

3. Or click on a Tag Name to view a list of all the resources with that tag.


4. Use the UNGROUPED Toggle to display all of your portal resources in a single list. From there, you can sort the Name Column to quickly find a specific document.

5. Click on the Resource Name to open the file.


Resources, your company-centric documents like checklists, processes and procedures, scripts, etc., can be accessed by the teams assigned to that resource exclusively through the Resources facet of the portal, by harnessing the search feature, or using direct links to the resource.
As for creating, updating, or deleting resources, users need to have the necessary permissions. Whip up a new resource any-time, but ensure you've set up at least one Tag and one Team in the portal.
Don't have any tags or teams yet? Learn how in our setup guide, Setting Up Your Portal.
- On the Resources page, click the green + A RESOURCE BUTTON in the top right of the page.

2. Either drag and drop the resource file(s) into the gray upload area, or click into it to browse files on your computer.
Note: Perdix accepts the following file types: .pdf, .doc, .docx, .ppt, .pptx, .xls, .xlsx, .jpg, .jpeg, .png, .eps, .tiff, .tif

3. The file count below the upload area will update to indicate the files have been received. Click Next.

4.Give your file(s) a Title and Version Number (if applicable), then assign its relevant Teams and Tags. Click Next.
📚 Best Practices: The Version Name is what displays in the resource's Version Dropdown. Consider using dates or descriptions that will allow your users to easily understand the differences between versions. Examples: Spring 2020 vs. Fall 2021

5. Click Upload to add the files.

6. If you uploaded a single file, you'll be redirected to it.

If you uploaded multiple, you'll be taken back to the Resources page.
In the Grouped view, your newly added resource will appear under its selected tags. You can also find it by toggling to UNGROUPED and finding it in the list.
Perdix's Questions & Answers facet is a vibrant hub for Perdix users to ask questions, share knowledge, and learn from each other—it's a space designed for mutual growth!
📖 In this guide:
- The Q&A Universe
- Subscribing to a Question
- Exporting a Question
- Engaging with Questions & Answers
Navigate to the Q&A section via the left-hand menu.

Questions appear from newest to oldest. Check the 'Answer' and 'View' metrics right next to each question title for quick insights.

Filter questions using the 'All Questions', 'Active', or 'Unanswered' tabs.

Subscribing to Questions
Subscribing to the Q&A section allows you to receive concise summaries of Q&A activity delivered via email at your chosen frequency.
1. Click on the Explore/Subscribe button.

2. Choose your preferred frequency: Daily, Weekly, or Monthly.

3. Filter with specific tags by picking from the drop-down list.

4. Hit Subscribe Now to confirm.

5. To exit, click the "Explore/Subscribe" button again.
Exporting a Questions
The export option allows you to download an Excel-friendly version of the Q&A content.
1. Click Export/Subscribe and choose the data range: Last 30 days, Last 90 days, or All.

Note: Use the "Exclude answered questions" checkbox to quickly export a file of all questions that still need answers.
2. Click Export to get a CSV file download.

3. To close, click the "Explore/Subscribe" button.
The Q&A section lets you ask, answer, and categorize team queries. Questions, once added, are accessible to designated team members. Questions can be accessed directly in the Q&A section, through search, or via direct links.
Permissions & Setup
Only authorized users can create, modify, or remove questions and answers.
To post a question, ensure your portal has at least one Tag and Team. Need setup guidance? Refer to our guide: "Setting Up Your Portal".
Reading Question
Simply click on a question title to view its details, tags, teams, and associated resources.

Commenting on a Question
Use the "Add Comment" button. Remember, comments are best for seeking clarity or offering suggestions. Avoid using them for direct answers.

Answering a Question
Answers appear below the question, from oldest to newest.
To contribute, type your response in the editor and hit "Post your Answer."

To remove an answer you've shared, click the trashcan icon in the top right of your response.

✍ Asking a Question
1. Navigate to Questions & Answers on the Portal dashboard.

2. Click Ask Question in the top right.

3. Enter a clear title; ideally, this should be the question for quick identification.

4. Detail your query, utilizing the formatting toolbar for enhancements like links, headers, or images where applicable.

5. Assign appropriate Teams and Tags for access and categorization.

6. Optionally, attach a supporting resource by clicking Add Resource.

7. Click "Post Question" to submit it.

Note: Currently, draft saving isn't available. Yet, you can edit your question anytime.
Managing Your Questions
1. Refine your question by clicking the "edit" link below it.

2. "Lock" a question to prevent further changes or answers.

Note: While you can lock or unlock your own questions, Admins and Managers can manage all questions (including lock and unlocking yours).
3. To delete a question, use the trash can icon.

Welcome to the world of the Knowledge Base on Perdix - the perfect spot for engaging articles, enriching tutorials, and additional reading. Curate your Knowledge Base articles with formatted text, vibrant images, engaging videos, helpful attachments, and insightful links.
📖 In this guide:
- Touring the knowledge base
- Exploring the article layout
- Grasping permissions
- Creating Knowledge Base categories and subcategories
- Creating Knowledge Base articles
Articles are grouped into categories and subcategories based on their topic. To see all articles related to a specific category, first select the Category card.

The list of articles will appear, grouped by Sub-category.

Make a category selection by clicking on a category card. Watch as categories unravel into finely classified subcategories.
To read an article, simply click on its title.

Inside an article, you can hop to different articles within the same subcategory by using the << Previous Article and Next Article >>buttons at the foot of the article.

Other articles in the specific subcategory are visible in the side-bar, and can be opened by clicking on them.

Categories are the main organizational element of the Knowledge Base. They make browsing easier by grouping topically similar articles together. Further, each category is finely divided into individual subcategories.
To create new categories and subcategories:
1. Expand the Knowledge Base menu, and click Add Categories.

Note: This option will only appear to roles with the correct permissions. To learn more about permissions, please read Configuring Roles and Permissions.
2. Click on the Create new category button.

3. Add your Category Name and Short Description. These are what will appear on the category's card.

4. Click Upload Image to select the category's card image.

5. Type subcategory names in the Subcategories field. Make sure to hit Enter after each subcategory name.

Note: Subcategories are required to create articles.
6. Click Create, and voila! Your new category now exists.

Note: Your new category won't be visible in the Knowledge Base until at least one article has been added to it.
Before you begin your journey creating new articles, ensure you've created the necessary categories and subcategories.
1. Expand Knowledge Base in the left navigation, and click Add Articles.

2. Click the New button in the upper-right corner of the Articles Management section.

3. Give your article a meaningful title, and use the Category Picker to assign it to the relevant categories and subcategories.
Note: An article can be nested within numerous categories and subcategories. At least one subcategory is required in order to publish it.

4. Add your article content. Use the formatting toolbar to add formatting, create headers, add links, include quotes, build out tables, and/or insert images or videos.

5. If you're not ready to share your article with the world, click Save Draft to save your progress.

6. Click the Publish Article button when you're satisfied with your article. This will add it to the assigned subcategories, and it will be visible in the Knowledge Base.

❗Important: When a new article is published, the system automatically sends an email notification to users of the branch to notify them that it's available. If you don't want these notifications enabled, talk to your Account Manager today.
Administrators and content authors can add content and quick reference links to each Branch in their Perdix portal. This helps users find content that is referenced often or access links to systems outside of Perdix, to make it easier for users to find the important content and tools they need.
To add and edit Quick Links, admins need to have the proper Permissions for Quick Links.
If they have permissions, they can open the Administration panel in the menu bar and then click Quick Links.
Once open, the admin can edit the content and add hyperlinks and other content as desired.
You can even link to resources within the portal. The first step is to copy the desired content's URL. Then click on Quick Links, and open it up. Last, use the Link button to add a hyperlink with custom text into the Quick Links box.
Quick Links is accessible from every page in Perdix from the top right of the dashboard under the Star icon.
When a team member initially signs up for the Perdix portal on behalf of a company, they are designated as the “Account Administrator.” This role is pivotal, acting as the primary custodian and facilitator for portal setup and user additions.
📖 In this guide:
- Account Administrator Abilities
- Differences with Other Super Admins
- Retiring an Account Administrator
- Adding Users to the Portal
- Key Points
What makes the Account Administrator unique? This role inherently possesses the “Super Admin” status. However, it's worth noting that there's no internal distinction between the initial Account Administrator and any subsequent Super Admins added down the line. The Account Administrator is automatically integrated into all portal branches, ensuring comprehensive oversight. If there are any new branches introduced, the Account Administrator is seamlessly included in those too. With such an elevated role, the Account Administrator has sweeping privileges, allowing them to enact any modification or removal within the portal. While they might not be auto-enrolled in all teams and tags, they have the visibility and control to manage them, intervening as needed.
But how do other Super Admins compare? The key differentiator is their non-automatic inclusion in new branches. For instance, if a new branch is introduced, subsequent Super Admins won’t join it by default; it requires a manual addition. If ever there’s a need to distinguish between the original Account Administrator and other Super Admins within the portal, it's recommended to reach out directly to the Perdix representative for clarity.
In the case where an Account Administrator needs to be retired or demoted, any other user with Super Admin rights can make necessary adjustments via the User Management section of the portal. And once the Account Administrator is deactivated, akin to other standard users, they lose access to the portal.
Users can be added one by one by an authorized administrative user, or they can be imported in bulk using our Bulk Import flow.
Bulk Import Users
For large lists of users that you want to add all at once, you can use our Bulk Import flow. Use the provided template that can be downloaded when the Bulk Import Users button is clicked. Ensure that all Teams, Roles, and designations exactly match those in your Perdix Portal to ensure a proper upload of users.
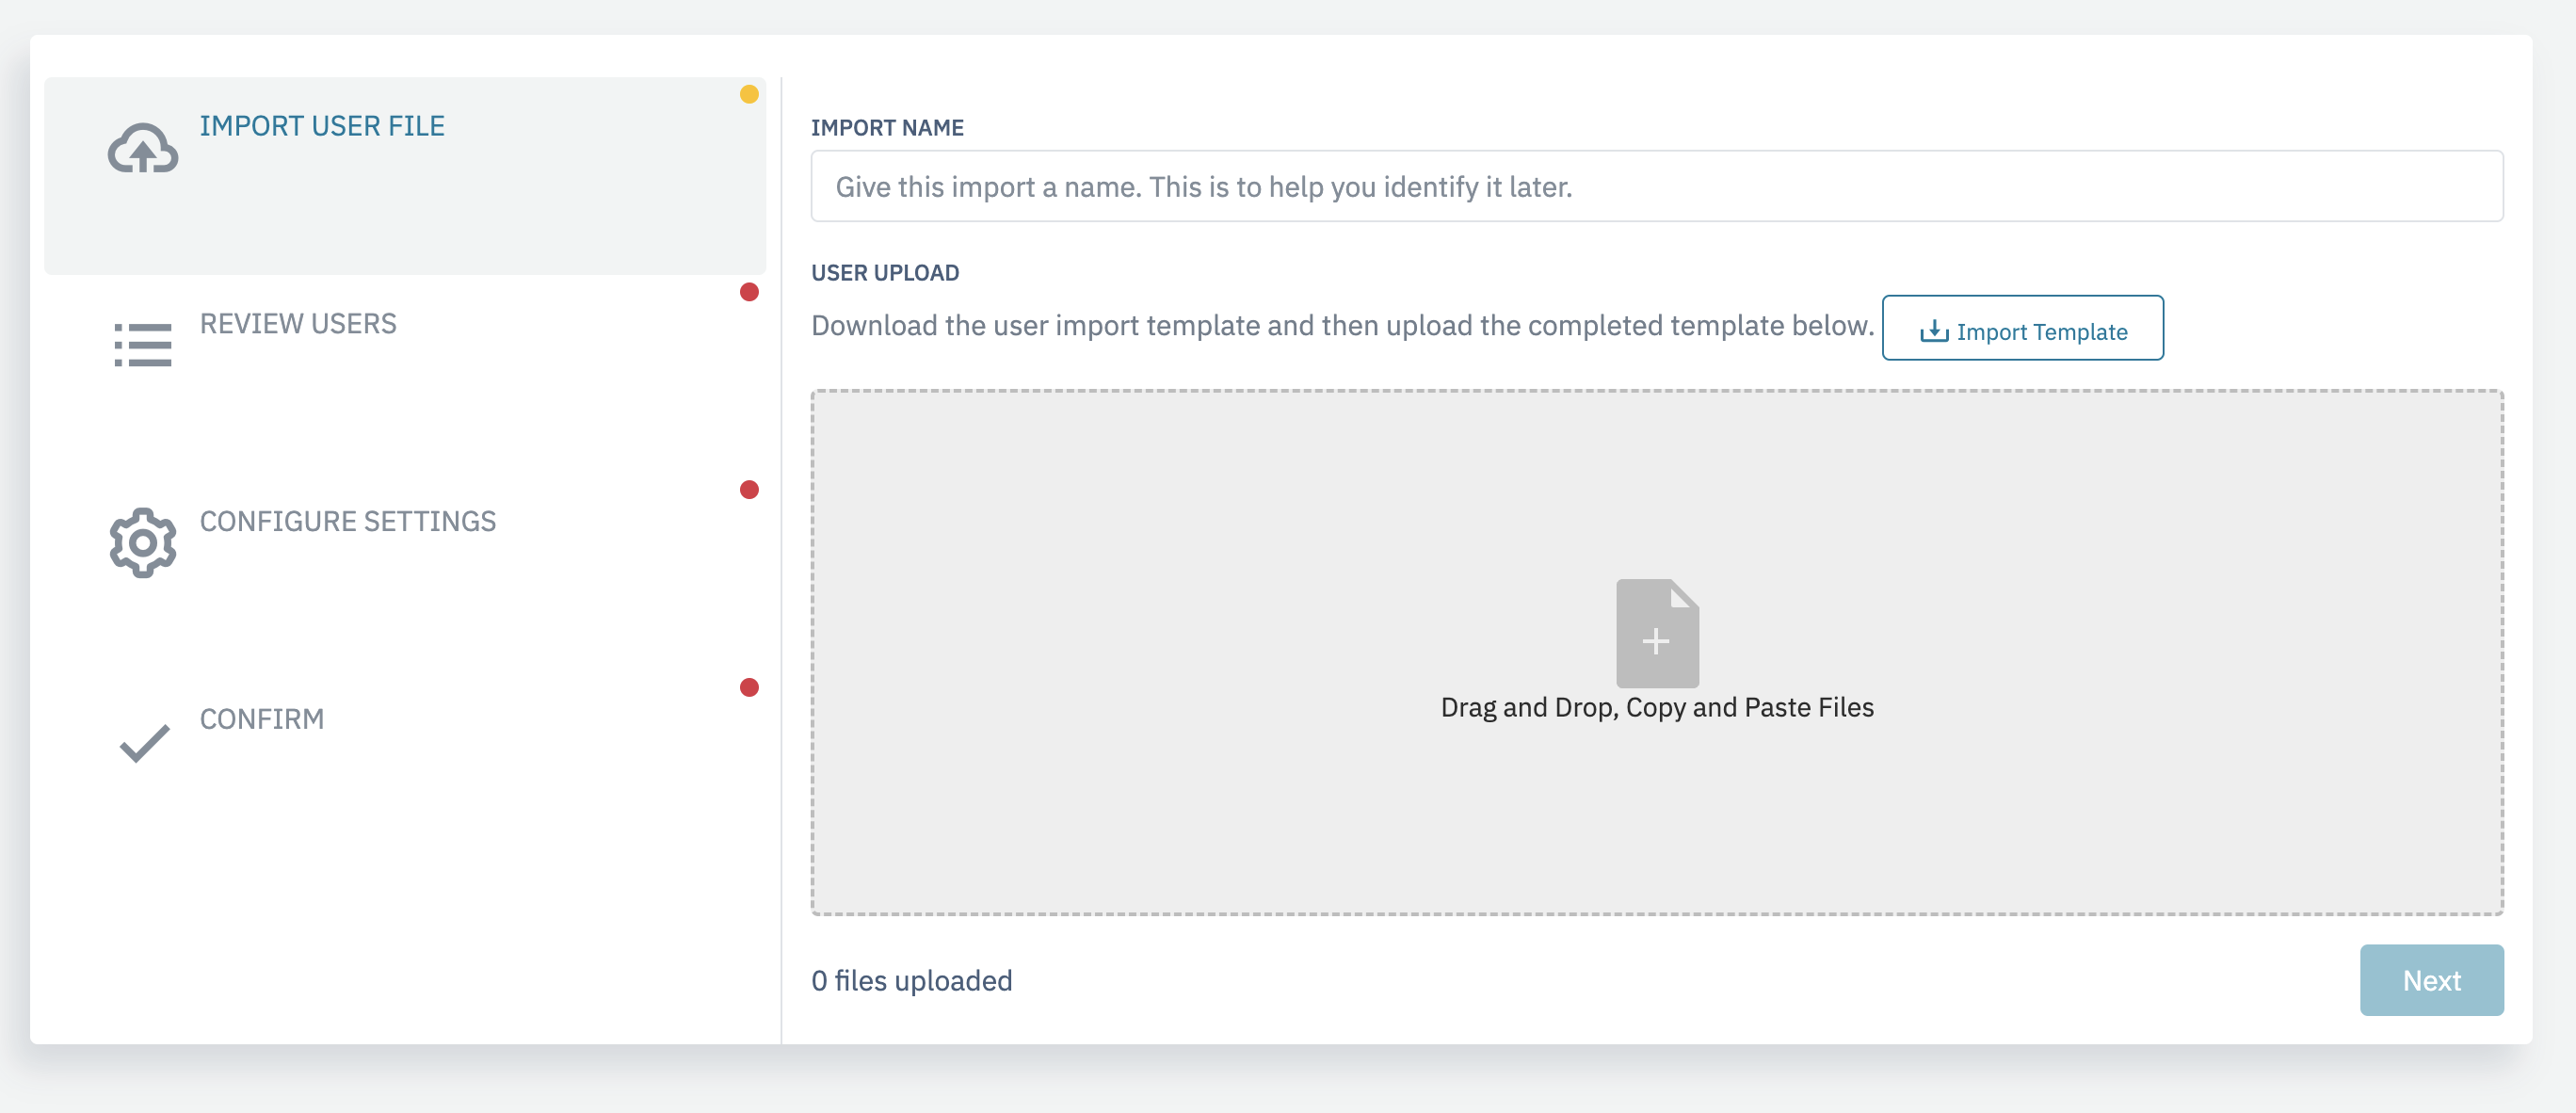
Once your user list is uploaded, you can validate that the fields are loading correctly and matching the Teams and Roles in the system.
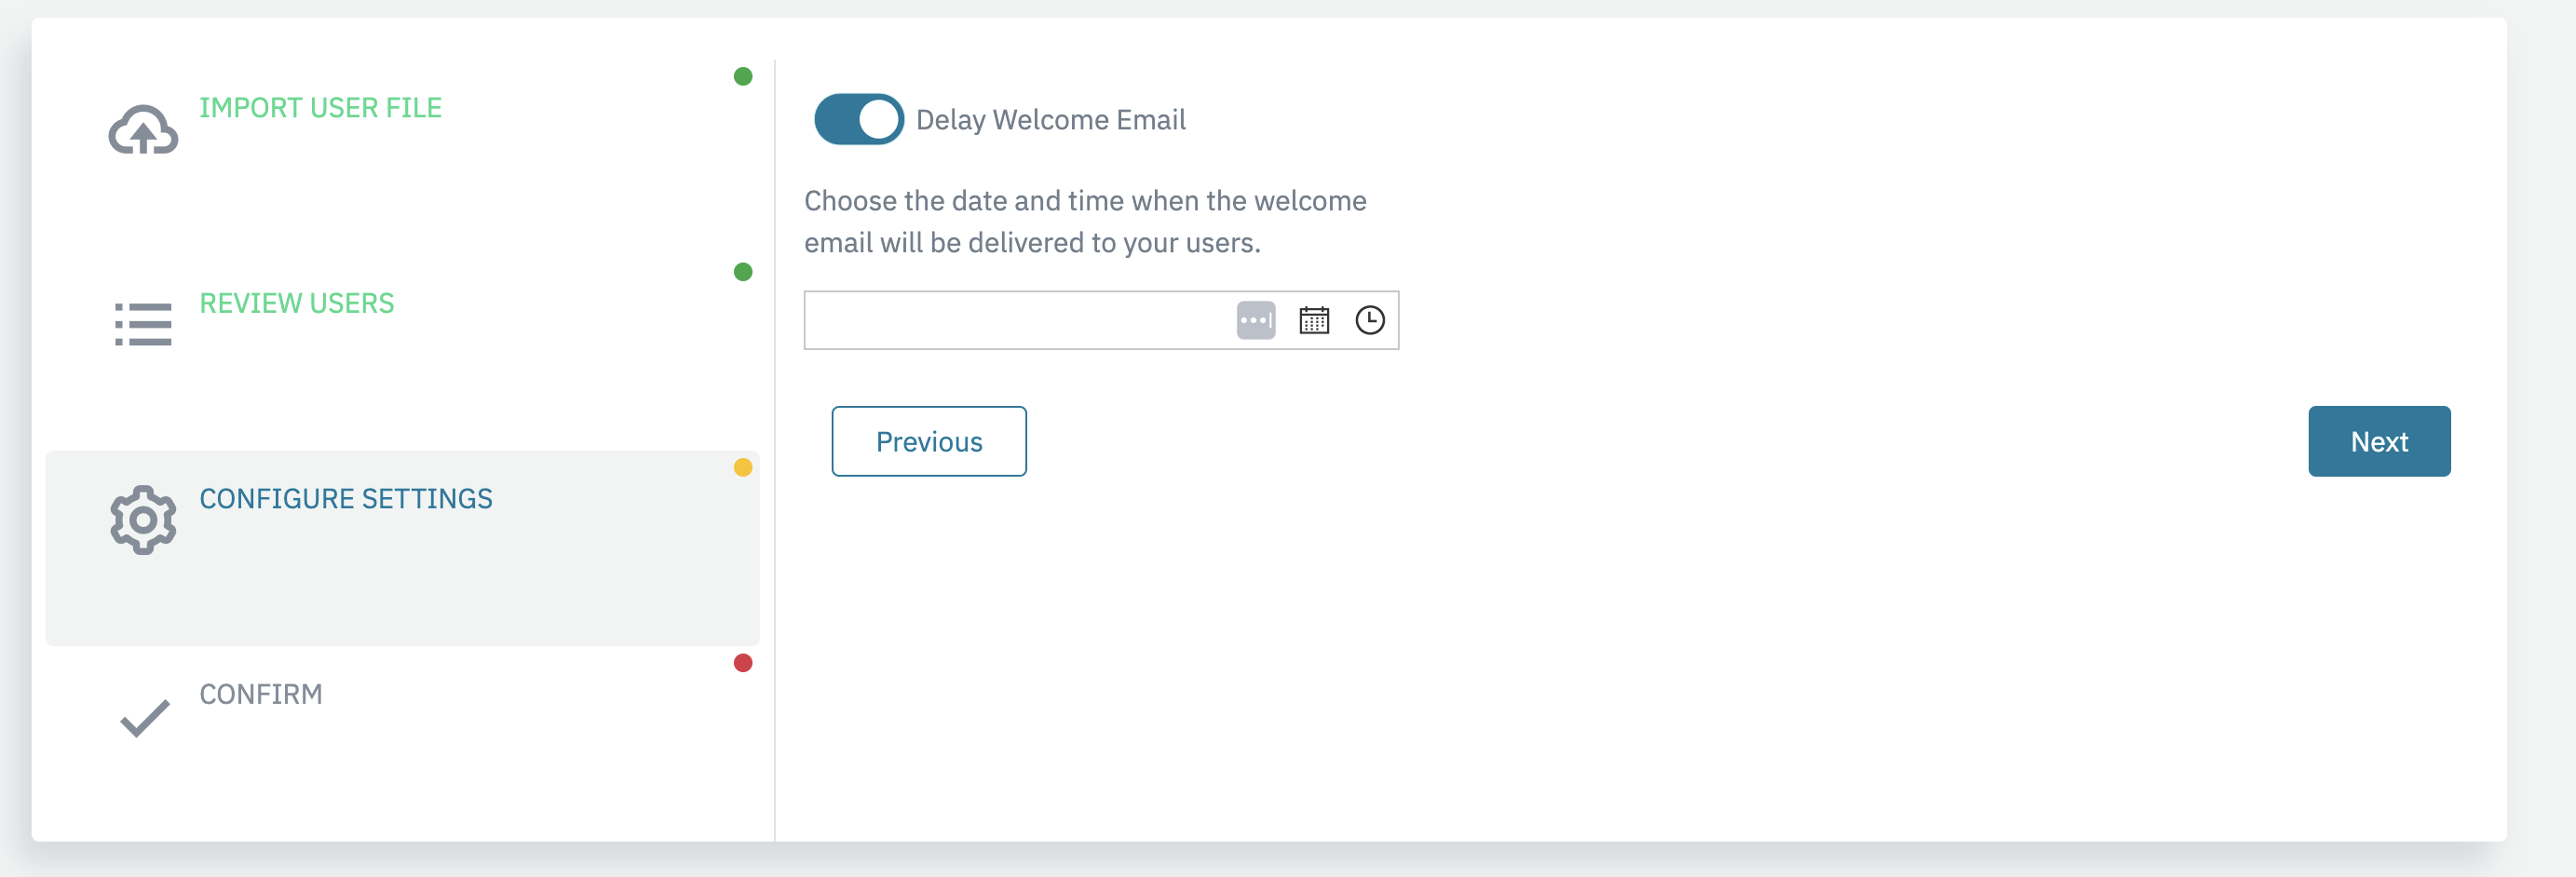
Last, you can schedule the date and time of the user upload for immediate release, or for a time in the future. The delay allows you to schedule an email blast to be delivered at your specified date and time to ensure users receive the Perdix invite email when is most convenient for them to see it and accept it.
Individual Users
1. Expand the Administration menu in the left navigation and click Users.

2. Click the Create new user button on the top right of the screen.

3. Fill in user's details.

Note: Email can act as usernames in certain Portal configurations and can’t be changed.
5. Assign their “Role” - roles determine user actions.

6. Designate the user’s “Teams” and “Branches”. Both determine the user's content visibility.

7. Click “Save.” The new user has been created. They'll receive an email invitation to join your Perdix portal.

